Toyota Camry 2002-2006: How to Replace Fuel Filter
The quality of fuel at various gas stations can differ. This is where fuel filters come into play. Manufacturers sized a filter to a certain size or micron rating to filter out large contaminants.
By Weston Chadwick - November 9, 2015
Contributors: Peter Finn
This article applies to the Toyota Camry (2002-2006).
Over time, as the fuel pump continuously cycles fuel through the tank, the filter begins to restrict. Dirt from the tank and the fuel inside becomes trapped in the filter, reducing the flow into the pump. As the dirt collects, it may become dislodged from the filter where it can again become trapped at the injector. The result is a loss of pressure, rough engine running, and potentially a pump failure. Installing a new filter "sock" restores proper flow, maximizing fuel economy and engine operation.
Materials Needed
8mm, 10mm, and 12mm wrench
Flat head screwdriver
Hammer
Strap wrench (optional)
Rubber gloves
Safety glasses
Fuel filter
The fuel filter is also known as the fuel pump "sock." It is internal to the tank and attached to the fuel pump assembly.
Step 1 – Remove the fuel pump fuse
Remove the relay labeled "E.F.I." in the underhood fuse box. This box is located to the right of the battery. On the bottom of the fuse box cover is a diagram of the fuse and relay locations. Once the relay is removed, start the engine and wait for the engine to stall. This should not take longer than one minute. You've now removed the pressure from the fuel system.
Figure 1. The fuse box location.
Step 2 – Disconnect battery and remove rear seat
Loosen the nut holding the negative (black) battery cable to the terminal with a 8mm, 10mm, or 12mm wrench. Wiggle the cable off and place it in an area where it cannot come into accidental contact with the battery, or wrap it with electrical tape. You'll be working around fuel and do not want electricity passing through wires because a spark may cause an explosion.
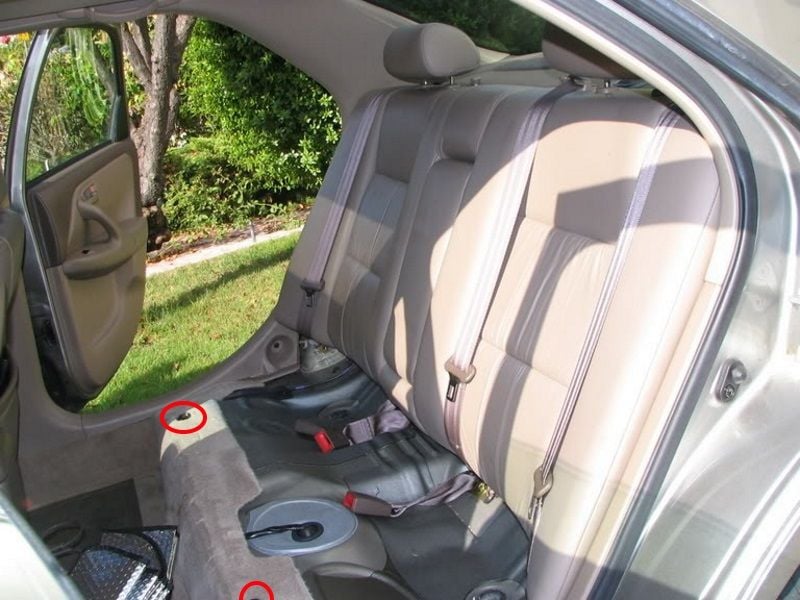
After disconnecting the battery, remove the rear seat. There are two clips on the front of the bottom seat cushion. These clips are located behind the front driver and passenger seats. Pull upwards on the front of the bottom cushion to release the clips. Once released, pull the cushion forward to remove it. You may have to twist it to bypass the seat belt buckles.
Figure 2. The red circles indicate the seat cushion clip locations.
Step 3 – Remove the fuel tank cover
Separate the rubber wiring grommet from the cover, and then pry the cover upwards with a flat head screwdriver. The cover is only held to the body with glue. You can see the cover and rubber grommet between the seat cushion clips in Figure 2.
Step 4 – Disconnect the electrical connector and fuel line
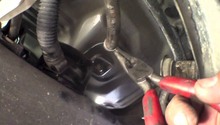
On top of the electrical connector is a plastic flap that exposes the flexible connector tab. Lift up on the flap (flexible tab side) to disengage it. Disconnect the electrical connector by squeezing the flexible tab and pulling upwards. Disconnect the fuel line by squeezing the two buttons on the side of the line and pulling it away from the pump.
Figure 3. The fuel line and electrical connector at the fuel pump.
Step 5 – Remove the fuel pump lock ring
This is the black ring surrounding the white fuel pump assembly (Figure 3). A special tool is made for this, but a strap wrench or a screwdriver/hammer combo can be used to loosen it if hand strength is not enough. Tap the edge of the screwdriver against the raised edge of the lock ring in the counterclockwise direction.
Step 6 – Replace the fuel filter
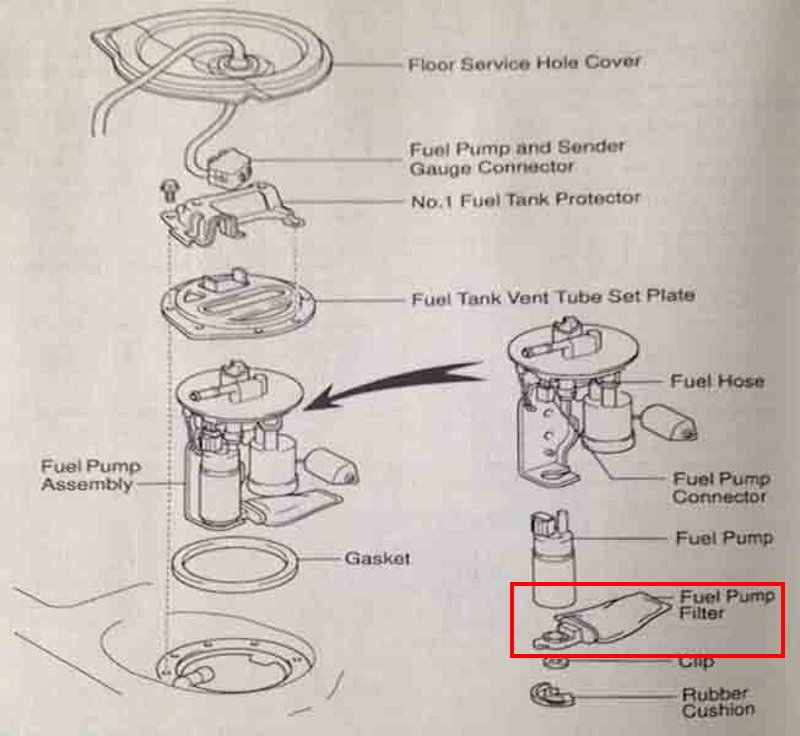
Lift up on the fuel pump assembly to expose the wiring connector on the side. Squeeze on the flexible tab and pull the connector towards the wiring to release it. Fully remove the fuel pump assembly from the tank, carefully tilting it as you lift. On the bottom of the fuel pump assembly you will see the fuel filter. Remove the clip and rubber cushion holding the filter "sock" to the pump and install the new filter in its place.
Figure 4. The fuel pump filter is boxed in red.
Step 7 – Finish the installation
Follow the steps in the reverse order of removal. As you place the fuel pump assembly back into the tank, make sure the rubber sealing gasket is flush against the face of the pump; otherwise, a fuel leak will result. With the filter assembly in place, put the cover back on and reattach the locking ring. Reassemble the rear seat bench and plug the battery back in.
When your ready to start the engine, cycle the ignition key on/off three times to prime the fuel system. Check for fuel leaks around the pump.
Featured Video: How to Change Fuel Pump and Filter
How to Replace Fuel Pump
Can't start your car? A faulty fuel pump may be the culprit.
This article applies to the Toyota Camry (1997-2001).
There might come a time when you go to get in your car to drive away, you ...
How to Replace Fuel Tank Overfill Check Valve
Do you have a P0440 or P0442 code? Start here!
This article applies to the Toyota Camry (1997-2001).
The fuel tank overfill valve is often referred to as a ORVR or ...
Fuel Diagnostic Guide
white90dx, Doctor J
There is a fine line between too much fuel and not enough.
This article applies to the Toyota Camry (2002-2006).
Inside the fuel tank is the fuel pump and fuel pressure ...
Why Won't My Car Start?
Do you want to go somewhere but your Toyota Camry won't let you?
This article applies to the Toyota Camry (1997-2011).
When you turn your key to the ignition start position, energy from the ...
How to Replace Fuel Filter
Nobody likes dirty fuel, including your Camry's engine.
This article applies to the Toyota Camry (1997-2001).
It is recommended to change the fuel filter in your Toyota Camry every ...
Why is My Car Getting Bad MPG?
Put money back into your pocket by restoring your gas consumption to its proper levels.
This article applies to the Toyota Camry (1997-2001).
The computer system's primary job is to ...