Toyota Camry 2007-2011: How to Install Remote Start System
A remote starter makes it easy for you to have a quick start to your day. Installing a unit is not as hard as some people make it out to be—here's how you do it.
This article applies to the 6th Generation Toyota Camry (2007-2011).
A remote starter is indeed a cool piece of technology, as it gives its users the ability to warm up their car, start the air conditioner on hot days, or even look impressive in front of their friends. Since the early 2000's, this accessory has been an increasingly common option for consumers who purchase newer vehicles. Because of the hype, many aftermarket companies offer the same type of system, which can be installed into your Toyota Camry. Sometimes, these installations can costs over hundreds of dollars, so we've taken it upon ourselves to show you how to install a remote start unit yourself, and in the end save you some cash-flow.

Materials Needed
- Phillips screwdriver
- 3/8" ratchet with 10mm socket
- Trim removal tool
- Zip ties
- Wire connecters
This article uses the Crimestopper PS-04 G4 as a point of reference. Other remote start systems may differ according to their installation.
Step 1 – Remove the knee bolster and steering wheel panels
All wiring is accessible under the steering assembly.
- Grab a Phillips screwdriver and remove the screw located on the right sight of the knee bolster.
- Pry up the kick panel to access the bolt underneath, and then use a ratchet with 10mm socket to remove the bolt.
- Once the bolt has been removed, unhook the hood release cable and pry out the knee bolster.
- Remove the Phillips screws holding the steering wheel panels in place.
- Remove the four 10mm bolts holding the airbag assembly bracket in place, and very gently set it aside.

Figure 1. Remove screw on the bottom right side of the lower dash. 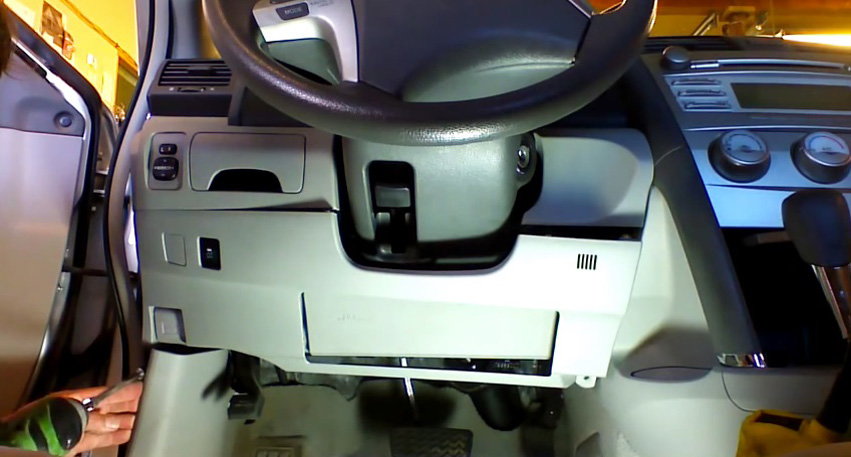
Figure 2. Remove the knee bolster. 
Figure 3. Remove the airbag assembly bracket.
Step 2 – Plug in the remote starter module
The PS-04 Crimestopper module uses a plug-and-play connector that connects directly to the ignition switch.
- Plug in the new wire harness connector to the remote starter module.
- Plug in the other end of the wire harness to the ignition switch.
- Ground the remote starter module.

Figure 4. Connect the remote starter module to the ignition switch connector. 
Figure 5. Ground the remote starter module.
Step 3 – Test the remote start system
No, you are not done just yet! Now you have to test the system to ensure everything is in working order.
- Take your factory Toyota Camry key, and insert it into the lock cylinder.
- Press the remote start button and wait approximately three seconds.
- When it starts, proceed to Step 4.

Step 4 – Wire the diagnostic and immobilizer plugs
With the remote starter module connected, you now need to wire in the anti-theft portion of the unit. You will be running two pairs of wires: one to the can-hi and can-lo plug, and another to the immobilizer plug.
- For the immobilizer plug, splice into the brown (code) and red (DST) wires.
- For the can-hi and can-lo wires, splice into the black (can-hi) and white (can-lo) wires.

Figure 7. Splice the immobilizer wires. 
Figure 8. Splice the can-hi and can-lo wires.
Step 5 – Program remote starter and re-install
- This part is simple. After the module is connected, simply place the key into the ignition switch, turn it on, but do not crank the engine.
- Pay attention to the light on the remote starter module—it will stay red for a while and then flash green. When you see the green flash, remove the key.
- Put the key back into the ignition, turn it on (again without cranking the engine), and wait for the module light to turn green. Once it turns green, the remote starter is programmed.
Once the installation is complete, you can begin to re-install the removed components.
- First, zip tie the remote starter module and wire harnesses to secure locations.
- Mount the airbag bracket using the 10mm bolt.
- Then re-install the steering wheel panels, knee bolster, and kick panel.
- You are done!

Figure 9. Non-programmed remote starter module (red light). 
Figure 10. Programmed remote starter module (green light).
Featured Video: Plug and Play Remote Starter Installation
Related Discussion
- Remote Start Compatible with Smart Key? - CamryForums.com