Toyota Camry 2002-2011: How to Convert to Disc Brakes
Disc brake are better, easier to maintain, and will get your Toyota Camry stopping much quicker than drum brakes. Here's how to convert to disc brakes.
This article applies to the Toyota Camry (2002-2011).
Your rear brakes are responsible for about 25% of your total vehicle braking. Although this might not seem like much, they are very important in an actual stopping situation, because they help keep your braking balanced. Most cars on the road today use 4-wheel disc brakes, which not only significantly improve braking performance, but also help the aesthetics of the car. Drum brakes lead to more brake fading, noise, and vibrations which are not acceptable for ultimate performance. However, this job is not as simple as it may seem and requires a lot of experience and patience. Read through this DIY to see if you are up to the task!
For further information on the disc drum conversion process, click here.
Materials Needed
- Torque wrench
- Metric socket set and wrench set
- Flat head screwdriver
- Pliers
- Hammer
- Jack
- Jack stands
- Pan
- Shop rags
- PB Blaster (optional)
Consider buying rear disc brakes from a V6 Camry to make the swap easier, with the exception of the parking brake cable and a few other small items.
Step 1 – Lift car
Lift your car with a jack on level ground and secure it with jack stands. Remove your rear wheels with a 19mm socket, which will reveal the outdated drum brakes.
(Related Article: How to Jack Up Your Car - Camryforums.com)
Pro Tip
Make sure the jack stands are on the car's frame so nothing is warped or broken.
Step 2 – Remove exhaust heat shield
Remove the parking brake cable from the bracket, which makes the cable loose. Do not remove the cable from the brakes. Take a picture of the setup so you have an idea of how to put it back. Remove two 10mm nuts on the exhaust heat shield and remove the shield.

Pro Tip
Apply PB Blaster on all bolts before proceeding to make them easier to remove during this process.
Step 3 – Remove brake drum
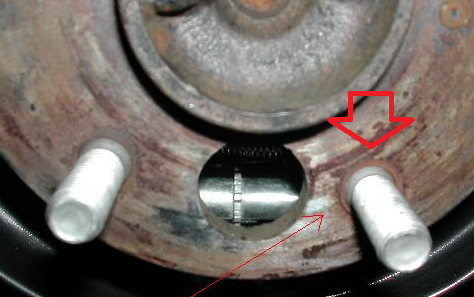
Remove the drum by taking a hammer and tapping all around the back of it until it loosens. If the drum refuses to come off, make sure the parking brake is released. You can also use two bolts on the brake drum itself to pry it off. Once the brake drum is removed, you will get to see the amazing contraption of drum brakes.

Pro Tip
Take a picture of the drum brake so you don't get lost during re-installation.
Step 4 – Remove wheel hub, brake line, and backing plate
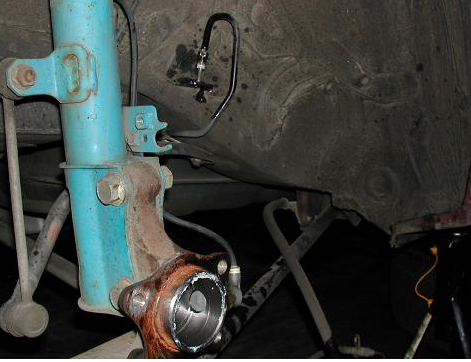
Remove the wheel hub by removing four 14mm bolts on the backside of the wheel hub. Then, take a hammer to convince the wheel hub to come out. Loosen the brake line by using a 10mm wrench. Do not remove it completely to avoid spilling brake fluid at this step. Now, the backing plate can be removed by simply pulling it off of the brake assembly. The brake line can now be removed as well.

Figure 3. Wheel hub removal. 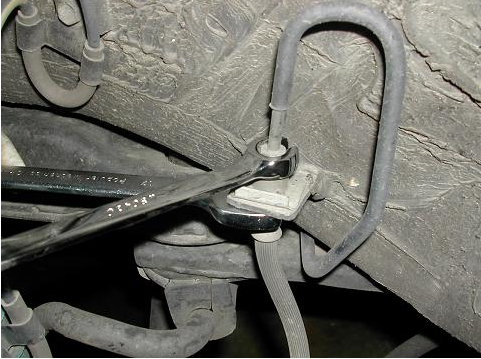
Figure 4. Brake line removal.

Figure 5. Backing plate removal.
Pro Tip
Brake fluid is extremely corrosive to car paint, so be sure you do not let any get in contact with the paint's surface.
Step 5 – Install new brake line, backing plate, and wheel hub
Install a new brake line for disc brakes as a direct replacement for the original brake line. The backing plate can go on the same way as removal. The wheel hub can now be mounted with the same four bolts. The brake rotor can be slipped onto the wheel hub. You are almost done!
Pro Tip
Clean all flat mating surfaces to make sure they are rust-free.
Step 6 – Install brake caliper
Install new brake caliper mounting bracket with supplied hardware to the backing plate. Also, install the new caliper and brake pads to complete your disc brake installation. You are now done with the hard part and have brought your rear brakes into the modern age!

Step 7 – Finish installation
All that is left is bleeding your brakes and adjusting your parking brake cable. Bleed your brakes, starting from the wheel farthest from the master cylinder. Then, adjust your parking brake cable to a comfortable engagement point to finish your installation.
Related Discussions and Site
- Rear Drum to Disc Conversion for '00 Toyota Camry LE 4 Cylinder - Google.com/document
- Disk Brake Conversion - Camryforums.com
- Camry Rear Drum Disc Conversion - Camryforums.com


