Toyota Camry: How to Replace Radiator
Replacing the radiator on a Toyota Camry is not only easy, but saves you a good chunk of change. Close inspection of the radiator might reveal corrosion, bent fins, or holes, which will cause cooling system failure. Find out how you can get back on the road with an efficient cooling system in no time!
This article applies to the Toyota Camry 4th, 5th, and 6th Generation (1997-Present).
The radiator is an extremely simple concept and is one of the most essential components of your Toyota Camry. As you drive, the air passing through the radiator dissipates the heat that your coolant carries through the radiator's cooling passages. Your water pump drives the movement of coolant throughout your engine block so it doesn't overheat.
Although some people might recommend a quick fix like Alumaseal, you run the risk of plugging up the entire cooling system and causing more problems. The most simple method of fixing a bad radiator is replacing it with a new one since they are not too expensive and come with a warranty. If you have a coolant leak or a bad radiator, find out how to replace your Camry's radiator using this DIY guide.

Materials Needed
- Ratchet and 10mm socket
- Flat head screwdriver
- Pliers
- Drain pan
- Rags
As a word of caution, never repair or replace your radiator when your engine is hot.
Step 1 – Drain the coolant
Open the drain cock on the bottom of the radiator to drain the coolant. The drain cock doesn't need to be removed; it just has to be loosened to allow the coolant to drain. Make sure you have a drain pan and rags ready to collect the coolant.

Step 2 – Remove the air box
Remove the two 10mm bolts that secure the air box to the engine bay. Once the bolts are removed, you can slide the air box out.

Step 3 – Remove the radiator fan
The radiator fan simply snaps onto the radiator. Use a flat head screwdriver to un-clip the radiator fan, and then slide it up as well as out of the engine bay.

Step 4 – Remove the upper mounting bolts
Remove the upper bolts that mount the radiator to the frame. There are four bolts total: two on each end of the frame.

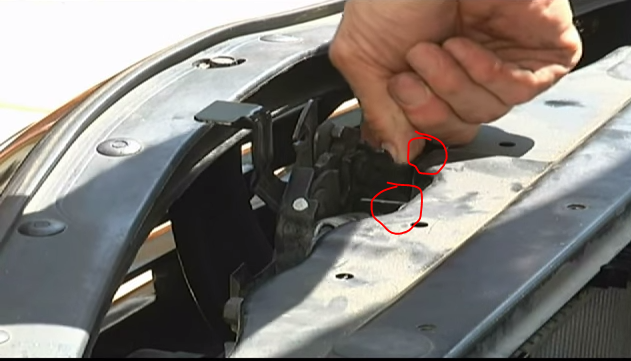
Step 5 – Remove the hood latch bolts
Remove two bolts holding the hood latch in place.
Pro Tip
Take a picture of the hood latch before removing the bolts in case there is an alignment issue after the installation.
Step 6 – Remove the overflow and upper radiator hoses
Pull the overflow hose off of the radiator; it is located next to the radiator cap. Then use pliers to loosen the hose clamps on the upper radiator hose, and slide the hose off of the radiator.

Figure 6. Location of overflow hose. 
Figure 7. Remove the upper radiator hose.
Step 7 – Remove the lower radiator hose and transmission cooler lines
Remove the lower radiator hose and the transmission cooler lines in the same way you did the upper radiator hose. Loosen the hose clamps and slide the hose and lines right out.

Figure 8. Remove the lower radiator hose. 
Figure 9. Remove the transmission cooler lines.
Pro Tip
Take pictures of where everything goes in case you need it during re-installation.
Step 8 – Replace radiator and re-install
Remove the four 10mm bolts on the edges of the A/C condenser; the condenser does not have to be removed, so make sure not to pull on it as it will crack the A/C lines. The radiator is now free and can be removed. Carefully maneuver the radiator up and out of the engine bay.
Install new radiator in the reverse order to the steps above.
- Insert the new radiator into the engine bay.
- Attach all hoses connected to the radiator, and secure them with the hose clamps.
- Re-install the hood latch and upper mounting bolts.
- Re-install the radiator fan and air box.
- Lastly, fill the radiator with new coolant and bleed the cooling system.

Featured Video: How to Replace the Camry Radiator
Related Discussion
- Camry SE Accident Fix Questions Radiator Condenser- CamryForums.com