Toyota Camry 1997-2001: How to Convert to Disc Brakes
Although drum brakes are adequate at stopping modern vehicles, they are an outdated design with many more components than a comparable disc brake setup. Here's how to take your Toyota Camry to the next level.
This article applies to the Toyota Camry (1997-2001).
The fourth generation Toyota Camry came in several different trim packages, some of which were equipped with rear drum brakes. A popular upgrade for many owners has been to fit a disc brake setup in place of the stock drum brakes. While there is nothing wrong with a properly working drum brake setup on the Camry, many individuals have opted for disc brakes when it is time for new brakes on the rear axle. Similarly, some owners have complained of brake fade, vibrations, and noise during heavy braking that were associated with the drum brakes and decided to seek out a better alternative. All of the components necessary to complete a disc brake swap are available at just about any parts store, as V6 Camry models used rear disc brakes as standard. While buying all new parts can be a bit pricey, many have swapped their brakes for pennies on the dollar by visiting a local junk yard and salvaging the rear brakes from a vehicle that is no longer in service. Either way, this article will walk you through the process of converting the rear axle of your Camry to disc brakes.

Materials Needed
- Ratchet
- Metric socket set
- Metric combination wrench set
- 10mm Flare nut wrench
- Torque wrench
- Screwdriver
- Pliers
- Rubber or plastic mallet
- Shop rags
- Floor jack
- Jack stands
- Wire brush
- Penetrating oil
Step 1 – Remove rear wheels
In order to gain access to the rear brakes, prepare to lift the vehicle. On level ground, jack the vehicle and support it with jack stands. Then remove the rear wheels.
(Related Article: How to Jack Up Your Car - Camryforums.com)
Step 2 – Remove parking brake cables
Since the disc brakes utilize different parking brake cables than the original drum brakes, the parking brake cables must be removed.
- Following the parking brake cable from either rear brake, locate the first two hold-down brackets and remove the fasteners.
- To access the remaining brackets, remove the fasteners securing the exhaust heat shield in place. Underneath the heat shield is another bracket for each parking brake cable. Remove the fasteners.
- Further towards the front of the car is a yellow bobbin to secure each brake line in place on their respective bracket. Pop the the yellow bobbins out of the brackets.
- Finally, remove the front of the brake cable from the bracket housing. Turning it 90 degrees will help the end slide out of the bracket. Repeat for the other side.

Step 3 – Remove rear hubs and brake assemblies
With the rear wheels removed, the hubs and brake assemblies can be removed.
- With the parking brake released, remove the brake drum. Use a rubber mallet or a similar tool to tap the brake drum outward and off of the hub. In severe cases, the use of two 12mm bolts can be tightened into the two holes of the drum to pull the drum away from the hub.
- With the drum removed, you now have access to the hub. Using a ratchet or air gun, remove the four bolts securing the hub in place. Access to the hub bolts is achieved through the hole on the face of the hub.
- With all four hub bolts removed, gently pull out on the hub to remove it. The use of a rubber mallet may be necessary if the hub is stuck in place.
- Disconnect the brake hose where it attaches to the hard brake line with a 10mm flare nut wrench. Also, be sure to remove the hose mount on the strut.
- With the hub removed and the brake hose disconnected, the remaining drum brake components do not need to be disassembled. They can simply be removed as a whole by removing the backing plate. Using a rubber mallet, tap the backing plate off of the hub mount. If your backing plate is severely corroded, penetrating oil and heat from a handheld propane torch can aid in removal.
- Pull the backing plate free along with the brake shoes and parking brake cable. Note that there may be a large O-ring that comes off with the backing plate if it did not come off earlier when removing the hub.


Pro Tip
It is recommended to soak all corroded or rusted fasteners in penetrating oil prior to removal. This will reduce the chances of a frozen or broken fastener.
Step 4 – Install disc brake backing plates and hubs
- Using a wire brush, clean the hub mount before installing the new backing plate.
- Install the disc brake backing plate. The parking brake shoes can be assembled to the backing plate prior to installation of the backing plate to the hub mount. Also, be sure to hook up the parking brake cable to the shoes.
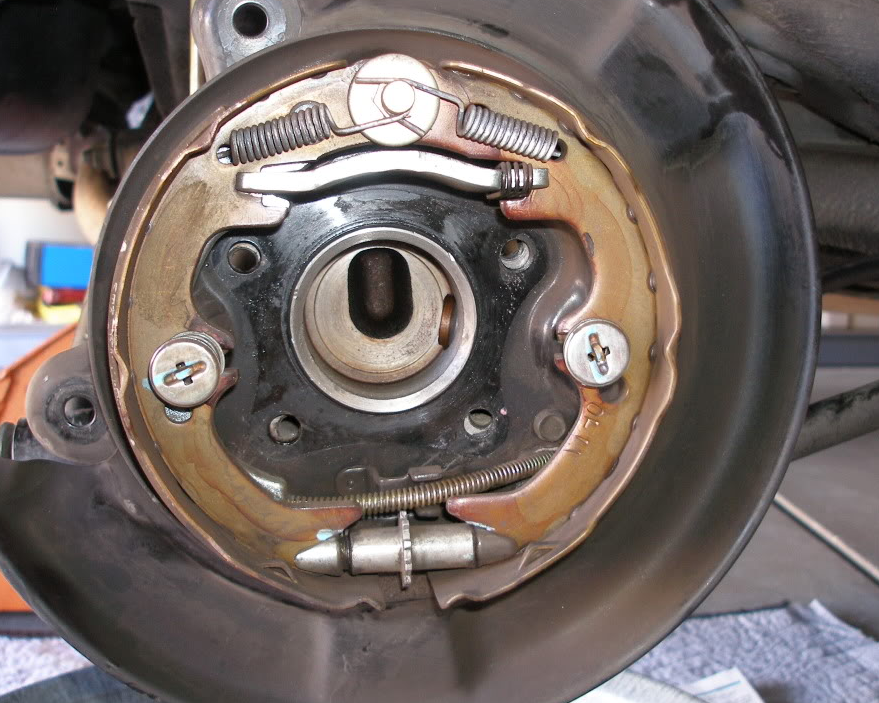
Figure 7. Backing plate and parking brake shoes installed. - Re-install the hub. Be sure to install the large O-ring onto the hub mount prior to installing the hub. Torque the hub to 59 ft/lbs.
- Install the new brake hoses to brake hard lines. Attach the hold down screws to each strut.

Step 5 – Install new parking brake cables and disc brake components
- The installation of the new parking brake cables is the reverse of the removal procedure outlined in Step 2. The new parking brake cables are exactly the same as the outgoing cables, so they should fit perfectly. The only difference between the two cables is their backing plate mount. Since new backing plates were installed, matching cables must be installed as well. With the cables in place, install the exhaust heat shield.
- With the star wheel set at its minimum adjustment, install the brake rotor onto the hub. A lug nut or two can be placed on the studs to keep the rotor in place.
- Install the brake caliper bracket onto the backing plate and torque to 34 ft/lbs.
- Install the brake pads onto the caliper bracket, then place the brake caliper onto the caliper bracket and torque the fastener to 14 ft/lbs.
- Finally, install the brake hose to the caliper using the banjo bolt and two copper crush washers. Torque to 21 ft/lbs.
- To adjust the parking brakes, locate the star wheel by looking through the small slit in the backside of the backing plate. Turn the star wheel adjuster until the brake rotor can no longer rotate, then back it off eight clicks to achieve proper adjustment. Do this on both sides.

Step 6 – Replace proportioning valve
In order to ensure a safe operation of the newly installed rear disc brakes, a new brake proportioning valve must be installed. The valve is located on the firewall, just behind the intake.
- Remove the plastic intake tube to access the proportioning valve.
- Before removing the mounting fasteners, disconnect the brake lines with a 10mm flare nut wrench. There are five in total.
- With the lines removed, remove the two bolts securing the proportioning valve in place and remove the valve from the engine bay.
- Install the new valve in the reverse order.

Pro Tip
The new proportioning valve differs depending on whether or not your vehicle is equipped with rear ABS. Choose the correct part for your application:
- Non-ABS Rear Disc Brakes: 47150-01030
- ABS Rear Disc Brakes: 47150-20270
Step 7 – Bleed brakes and re-install wheels
- With all components installed, bleed the brakes.
- Install the rear wheels and lower the vehicle off of the jack stands.
(Related article: How to Flush Your Brakes - Camryforums.com)

Pro Tip
Brake fluid is highly corrosive to a vehicle's finish. Immediately clean any spilled brake fluid to prevent damage to the vehicle.
Related Discussions
- Disk Brake Conversion - Camryforums.com
- Soft Brake Pedal - Camryforums.com