Toyota Camry 1997-2001: How to Replace Fuel Filter
Here is the how-to on replacing that fuel filter to keep that liquid goodness flowing nicely.
This article applies to the Toyota Camry (1997-2001).
It is recommended to change the fuel filter in your Toyota Camry every 50,000 miles or 36 months. This is necessary to keep fuel flowing at the rate that it should, and to keep unwanted contaminants out of your engine's fuel system. The fuel that you get at your pump has a good number of dirt or other debris in it and that is the last thing you want inside your fuel system, creating a bunch of unwanted problems. An over abundance of this dirt and debris inside your fuel filter can actually cause fuel flow as well as pressure issues if the filter is not changed out on a regular basis.

Materials Needed
- Millimeter wrenches (10mm-15mm)
- Flare nut wrenches (13mm-15mm)
- Millimeter sockets (10mm-14mm)
- Ratchet
- Flat head screwdriver
- Rags
Step 1 – Relieve fuel system pressure
The fuel system is under constant pressure, so any time you are going to disconnect any fuel lines, it is necessary to relieve the fuel system of this pressure before doing so.
To relieve pressure, do as follows:
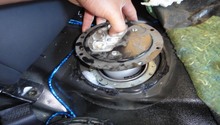
- Remove the rear seat and liner to access the fuel pump/sending unit access cover.
- Disconnect the harness connector.
- Start the engine and allow it run before it stops.
- Disconnect the negative (black) battery terminal. (If the stereo in your car is equipped with an anti-theft system, make sure you have the activation code before disconnecting the battery.)
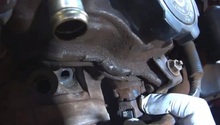
- Loosen the fuel line fitting at the bottom of the fuel filter. Be ready because there will be fuel that will leak out when you do this, and you will want to catch it to prevent it from spilling all over the place.

Figure 1. Disconnect negative battery terminal. 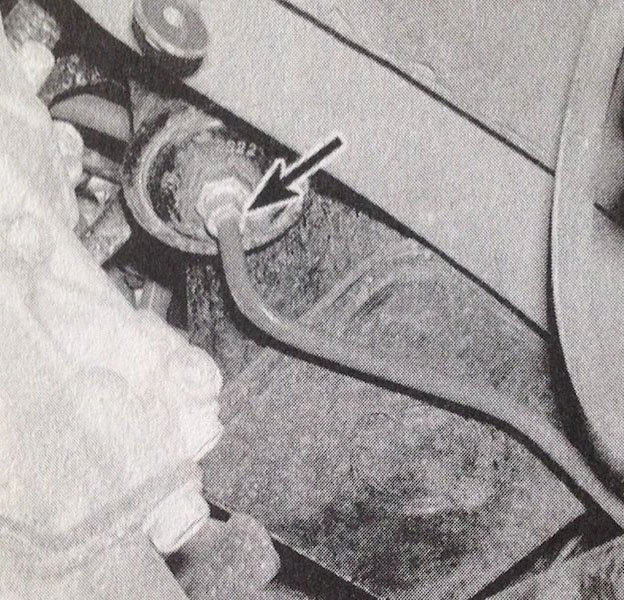
Figure 2. Location of bottom fuel line fitting on fuel filter.
Step 2 – Loosen fuel filter's top bolt
Using a backup wrench to hold the filter, loosen the bolt at the top of the fuel filter with another wrench. Then disconnect the fitting from the filter.

Step 3 – Remove filter and bracket assembly
Loosen the bolts that hold the fuel filter bracket to the bulkhead. This will allow you to remove the filter and bracket as an assembly. After you have removed the assembly, remove the old filter from the bracket.
Step 4 – Fit new filter to bracket
Note that the inlet and outlet pipes are clearly labeled on each end of the filter. The flanged end of the filter faces down. You must make sure that the new filter is fitted, so that it's facing the proper direction. The outlet faces UP and the inlet faces DOWN.
Step 5 – Re-install filter and bracket assembly
After you have the new filter installed in the bracket and facing the right direction, you can bolt the filter and bracket assembly back to the bulkhead of the car.
Step 6 – Reattach top and bottom fittings to new fuel filter
The new filter's manufacturer should have provided you with new sealing washers. Make sure to use these when reattaching the top and bottom fuel line fittings to the new fuel filter. After you have attached the fittings, go ahead and tighten them.
Step 7 – Finish Installation
After you have tightened the fittings, make sure to:
- Reconnect the harness connector of the fuel pump/sending unit.
- Reconnect the negative battery terminal.
How to Change the Fuel Filter
Related Discussions
- Camry Fuel Filter Replacement - CamryForums.com
- Fuel Filter Strainer - CamryForums.com
- Fuel Filter is Stuck - CamryForums.com