Toyota Camry 2007-2011: How to Replace Ball Joints
Is your Camry shaking when you try to turn? Sounds like you should replace your ball joints. Here's how to do so.
This article applies to the 6th generation Toyota Camry (2007-2011).
Of all the components on your suspension system, ball joints are often the most overlooked. These little pieces of rubber and metal are responsible for acting as a pivoting mechanism for the steering knuckle. When these units fail, your car will make a knocking noise and have a difficult time turning left or right. Some vehicles have ball joints welded into the control arm. Luckily, the ones found on your Camry are bolted into the LCA instead. Even so, shops often charge you a couple hours of labor per side. So if you are looking to save some cash, use these following instructions to replace the ball joints on your Toyota Camry.

Materials Needed
- Metric socket set up 19mm
- 19mm Crowfoot
- 4" extension for 3/8" drive
- 3/8" ratchet
- Jack and jack stands
- Needle nose pliers
- Ball joint puller
- Penetrating oil
- Multi-directional torque wrench
- Bungee cord
Step 1 – Loosen the wheels and raise the car
First break loose the the lug nuts on your wheels. Then take a jack and raise one side of the front vehicle. Do not lift the complete front-end because you'll be needing the weight of the car to help loosen the ball joint bolts. Make sure you place jack stands under the correct jack points on your car, so it can properly support the weight.

(Related Article: How to Jack Up Your Car - CamryForums.com)
Step 2 – Remove the rotor
- Now grab your 12mm socket and remove the bolt holding the brake line in place.
- Loosen the two 17mm caliper bolts, and remove the caliper.
- Do not disconnect the brake line; you can support the caliper with a bungee cord attached to the chassis.
- Grab the rotor and slide it out.
You'll then be able to see the ball joint beneath the wheel hub.

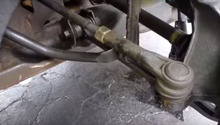
Step 3 – Remove the ball joint mounting bolts
- First loosen the castle nut on the ball joint, but do not remove it. Also, make note that the castle nut ranges in size according to which aftermarket brand you have used. However, stock units are 19mm.
- Remove the two 17mm bolts and one nut holding the ball joint assembly to the car.

Figure 3. Loosen the castle nut. 
Figure 4. Remove the ball joint assembly from the LCA.
Step 4 – Pop out and remove ball joint
Now you get to use the ball joint puller! Place the single arm onto the castle nut and the two prongs beneath the ball joint. Start to crank the puller until you hear the ball joint pop from its place. Then, finish removing the castle nut and pull off the ball joint.

Figure 5. How the ball joint puller should be mounted. 
Figure 6. Ball joint popped out.
Step 5 – Mount the new ball joint
- Install the new ball joint and tighten its castle nut using a 19mm combo wrench.
- Install as well as tighten the 17mm nuts and bolts to 94 ft-lbs.
- Tighten the castle nut to 90 ft-lbs.
- Insert the locking cotter pins into the hole.
- Mount the wheel and lower the car.
The process is the same for each ball joint on the vehicle. Repeat the steps until you are finished.

Related Discussions
- Front End Road Noise - CamryForums.com
- 2007 Camry LE V6 - Noise at 35 and up MPH - CamryForums.com
- Suspension Repair - CamryForums.com
- Control Arm Recommendations - CamryForums.com