Toyota Camry: How to Replace Front and Rear Shock Absorbers
At some point of your Toyota Camry's life, your shocks will go bad and you will need to replace them. Here's how to replace the front and the rear shocks.
This article applies to the Toyota Camry (1997-2011).
Let's be honest, the Camry is the typical economy car. It isn't the most robust or attractive, but it is dependable and when it comes to replacing parts, it isn't going to break the bank. After about 60,000 miles, the shocks will typically wear out. Shocks aren't too expensive on this car and with a relatively simple suspension setup, replacing them isn't that time-consuming. Take a friend aside for a few hours on a Sunday and you shouldn't bang up your knuckles when replacing the shocks.
Assuming you're not looking to put racing shocks on your Camry, you should expect to spend somewhere around $450 to $550 for the entire quality set, which isn't terrible considering how many modern cars will charge that for one shock alone. It's simpler and safer to buy a new, complete package with the spring attached and avoid spring compressing. At this stage, it's a good move to inspect the suspension bushings. If they appear tattered or worn, as well as moving excessively in their perch, it's probably good to put a new set on.
Materials Needed
Floor stand
Jack stand
14mm box wrench
Torque wrench
Breaker bar
Flat head screwdriver
Allen key
Block of wood
Front Shocks
Step 1 – Remove front brake lines
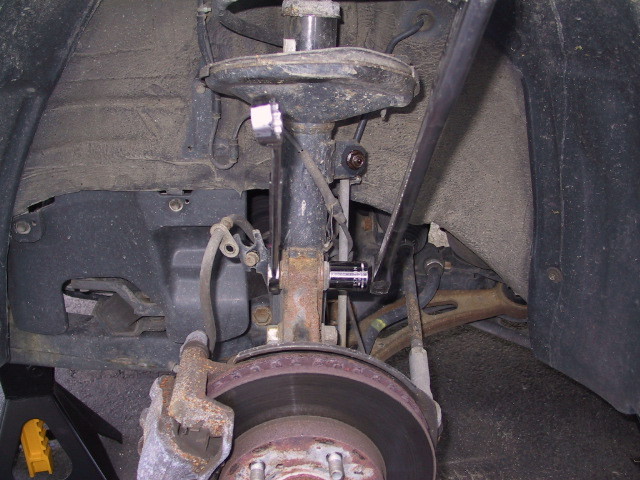
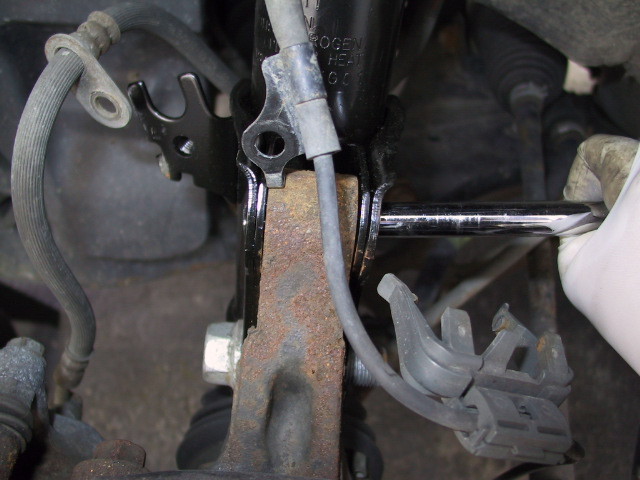
We'll start with the front brakes. After putting the car up as well as removing the wheel, find the brake line and follow it back to the strut. Remove the line from its mounting bracket and disconnect the ABS sensor. Remove the two bolts connecting the shock to the knuckle, which are located towards the bottom of the strut itself.
Remove the two bolts connecting the shock to the knuckle, which are located towards the bottom of the strut itself. This is fairly self-explanatory. Place the bolts and their nuts in a tin nearby, so you don't lose track of them.
Figure 2. Remove the bolts holding the shock in place.
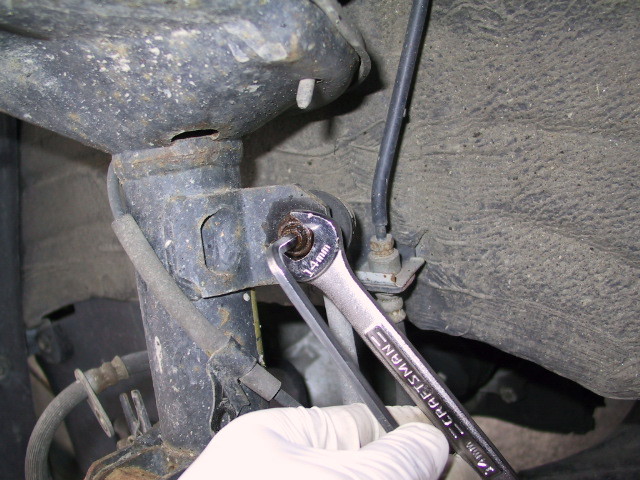
Step 3 – Remove the sway bar
Next, use an Allen key and a 14mm box wrench in conjunction to disconnect the sway bar. Hold the nut in place and loosen with the Allen key. Then disconnect the sway bar.
Figure 3. Remove the sway bar.
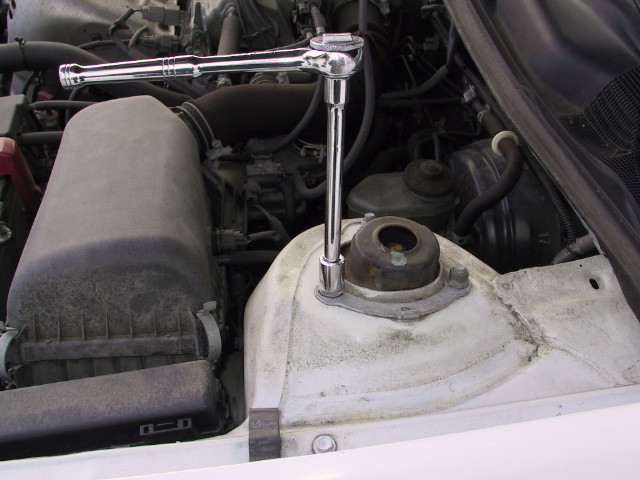
Step 4 – Remove upper strut nuts
Undo the three nuts on top of the strut mount. These are located under the hood on both sides.
Figure 4. Locate the top strut nuts under the hood.
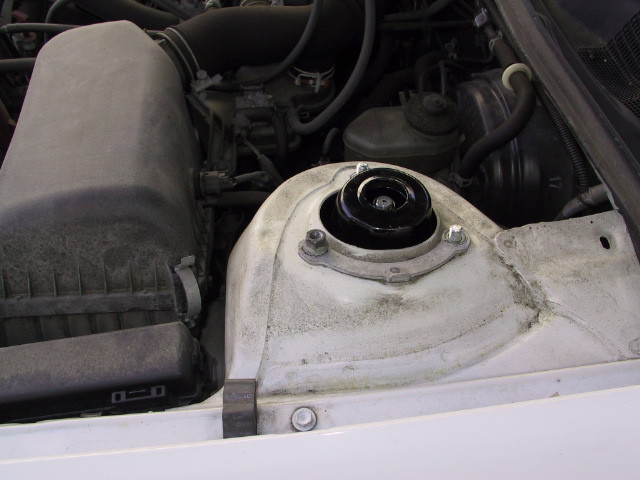
Step 5 – Insert the new strut into the strut tower
Insert the strut back into the strut tower, and thread on one of the three nuts to support the strut. Don't tighten too much, just do it enough to hold the strut in place.
Figure 5. Insert the new shock the same way you removed the old one.
Step 6 – Align mounting strut to knuckle holes
Align the mounting holes with the respective holes on the knuckle by using a screwdriver. Insert the bolts. Thread the nuts on, but wait to tighten them. We just want to stabilize the strut at the moment.
Figure 6. Align the mounting strut to the knuckle holes.
Step 7 – Tighten the nuts
Tighten the nuts on the strut-knuckle first, and then the sway bar connection. Tighten the sway bar end link afterwards.
Rear Shocks
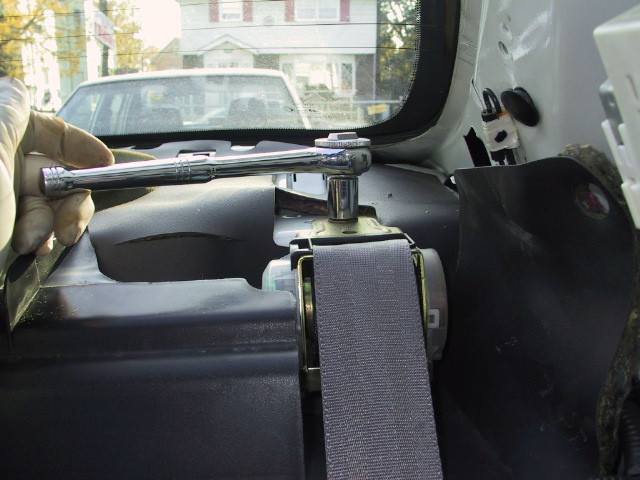
Step 8 – Access the rear strut tower
After removing the wheel, place a support like a block of wood underneath the brake rotor. You'll have to bring the rear seats down, disconnect the seat belt tensioner and remove the covering on the C-pillar.
Figure 7. Access the rear strut bolts.
Step 9 – Repeat steps 1 to 7
Repeat the process like you did for the front shocks. Remove the lower bolts and the upper nuts. Then install the new shock and tighten the nuts as well as bolts.
Step 10 – Reinstall
Reinstall the C-pillar's cover, connect the rear seat belt tensioner, and put the seats upright.
Step 11 – Get an alignment
It's recommended that you drive for a few days on your fresh shocks, and then get an alignment to ensure you don't prematurely wear out the shocks or tires.
How to Replace Struts
Restore your Camry's factory ride quality with this new part.
This article applies to the 5th generation Toyota Camry (2002-2006).
Struts move with the vehicle's unsprung weight. This weight ...
How to Install Lowering Springs
How low can you go?
This article applies to the Toyota Camry (2007-2011).
So, you want to lower your Toyota Camry? Well, just like with any other vehicle, there is a right and ...
Suspension Noise Diagnostic Guide
Noisy suspension? Time to sort it out.
This article applies to the Toyota Camry (2007-2011).
As it left the factory, your Toyota Camry had a quiet, comfortable ride, designed for ...
How to Replace Struts
Thai Dara
Do you need to replace your struts? Click here to learn how.
This article applies to the 6th generation Toyota Camry (2007-2011).
The struts on your Toyota Camry are responsible for ...
Suspension Modifications
Are you looking for some suspension options? Click here to see what's available for your Camry.
This article applies to the Toyota Camry 4th, 5th, and 6th generation (1997-2015).
One of ...
Why is My Car Squeaking?
The Toyota Camry is a comfortable, reliable car. Squeaking could ruin it for you.
This article applies to the Toyota Camry (1997-2011).
There aren't many things more annoying than a ...