Toyota Camry 1997-2001: How to Replace Tie Rods
Hitting potholes or curbs can damage the ball joint end of the tie rod, which, over time, can reduce the amount of steering feel through the wheel, prevent a proper alignment, and induce premature tire wear.
This article applies to the Toyota Camry (1997-2001).
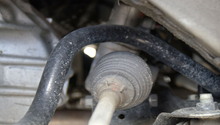
The tie rod ends are a common piece to wear over time. Though they're unlikely to fail, the constant abuse they endure—hitting curbs, potholes, etc.—make the tie rod a prime piece to wear out over time. They can also absorb dust or debris, which prevents proper lubrication to the ball-and-joint portion of the tie rod. Make sure this piece is in good condition to ensure good steering feel and response, as well as optimal tire wear.

Materials Needed
- 14mm and 19mm open wrench
- Ball peen hammer
- Universal joint separation tool
- Torque wrench
- High-temperature grease/grease gun
- Paint or whiteout
Step 1 – Expose the tie rod
Remove the wheel and prop the car on a jack stand to expose the tie rod.

(Related Article: How to Jack Up Your Car - CamryForums.com)
Step 2 – Mark the tie rod and separate
When separating the inner and outer tie rods, the pieces should be marked in their original position to ease the re-attachment process. Use some paint or whiteout to mark where the jam nut and inner tie rod line up. Then, using a 19mm open wrench to hold the jam nut, use a 14mm open wrench to loosen the inner tie rod.

Step 3 – Loose jam nut
Using a 19mm open wrench, loosen the jam nut and loosen the castle nut until it reaches the end of the threads, but don't disconnect entirely.

Step 4 – Remove cotter pin
Remove the cotter pin so that it allows the old tie rod to partially disconnect from the steering knuckle after the castle nut has been spun to the end of its threads.

Step 5 – Disconnect steering knuckle
Using the ball peen hammer, a few forceful but accurate taps should loosen the knuckle from the tie rod spindle. Using a universal separation tool is another option.

Step 6 – Remove tie rod end from inner rod
Remove the castle nut, separate the steering knuckle and twist off the tie rod end from the inner rod. Make sure to record the turns made on the inner rod.

Step 7 – Measure the old tie rod and the new one
Measure from the threaded end to the center of the tie rod spindle. Any difference, though uncommon, needs to be compensated for by adjusting the inner rod jam nut.
Step 8 – Spin on new tie rod
Spin the new tie rod using the proper number of turns previously recorded. If done properly, the jam nut won't need more than an 1/8 of a turn to secure. If the new tie rod is of a different length, add or subtract accordingly.

Step 9 – Position tie rod into steering knuckle
Spin on and torque down, but don't over-tighten! For this reason, a torque wrench is advised so proper tension is used. Without loosening, align castle nut opening with tie rod spindle hole for insertion of the cotter pin. With everything lined up, press your fresh cotter pin into the hole.

Step 10 – Lubricate tie rod end and adjust
Using the attached grease fitting (if supplied), torque down and lube with a grease gun. Molybendium sulfite should be in this grease. Then, using the markers from earlier, line up the inner tie rod and rotate with a 14mm wrench. Using the 19mm open end wrench, secure the jam nut into the outer tie rod end.
Featured Video: How to Change Tie Rods
Related Discussions
- Camry Tie Rod Replacement - CamryForums.com
- 1996 Outer Tie Rod End - CamryForums.com
- 1999 Camry Tie Rod Torque Spec - CamryForums.com