Toyota Camry 2007-2011: How to Seal Oil Pan Gasket Leak
If your car is leaving its mark whenever you park it in the garage, you've got an oil leak issue. Usually, the oil pan begins to slowly leak oil, staining your garage floor forever. If you're suspecting a leak, let's handle it with this repair.
This article applies to the 6th generation Toyota Camry (2007-2011).
While a leaking oil pan gasket most likely won't cause you to run out of oil going down the road, they can cause a mess inside your garage. With the proper tools, resealing it can be an easy job and save you a good chunk of money by not visiting the dealer. However, you will need to work under your car. So if you don't have a way to slide under it, it is suggested checking out some local mechanics' prices as they're generally cheaper than a dealer. In addition, if you still have a warranty, you should always visit the dealer first.

Materials Needed
- Drive-on car ramps
- Socket set
- Putty scraper
- Oil drain pan
- RTV silicone sealant or something similar
- Wheel chocks
Step 1 – Gain access
The first thing you'll need to do is be able to comfortably fit under the car where the oil pan is located. It is suggested using drive-on car ramps; however, parking over a ditch will have the same effect, but just be careful not to bottom out and damage your car. Once you have your spot to work in, don't forget to set the parking brake and chock the wheels. If jacking your car up conventionally, always secure it with stands.

(Related Article: How to Jack Up Your Car - CamryForums.com)
Step 2 – Remove oil pan
- Unbolt any plastic coverings or heat shields that block access to the oil pan. You only need to remove enough to get the pan out from under the car.
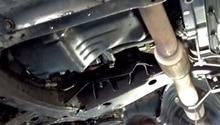
- Some people have had to remove the exhaust to get enough clearance to drop the pan straight down, while others have been able to slowly wiggle it out. If you need to remove the exhaust, you can unbolt it at the engine from the manifold.
- Place your oil drain pan under the car.
- Loosen and remove the oil pan drain screw to allow all the oil in the pan to fully drain out. See the red circle in Figure 2.
- Remove all the bolts attaching the oil pan onto the car. See the green circles in Figure 2.
- Using a putty knife or something similar, work your way around the oil pan carefully prying it free to break the old seal.
- Remove the oil pan.

Step 3 – Reseal the pan
- Using a putty scraper, carefully remove all the old sealant from the oil pan and from the mating surface on the car.
- Make sure both surfaces are clean and dry of any oil or other contaminants.
- Apply a continuous bead of RTV silicone sealant around the oil pan. See Figure 1.
- Depending on what sealant you used, follow the curing instructions on the package so you know how long to wait before re-installing, as well as how long to wait before refilling the oil and driving.

Step 4 – Wrap up
- Re-install the oil pan by installing the bolts in a crisscross pattern. Be sure not to over-tighten and strip out any of the bolts.
- If necessary, reattach the exhaust to the engine.
- Re-install any heat shields or plastic coverings.
- Refill the oil. This is the perfect time to do a full oil change and change the filter as well.
- Lower the car and start the engine, looking for any leaks. If everything is okay, then the job is done.
(Related Article: How to Change Your Oil - CamryForums.com)
Related Discussions
- Oil Pan Gasket Repair - CamryForums.com
- Oil Pan Leaking - CamryForums.com
- Replacing Oil Pan Gasket - CamryForums.com
- Oil Pan Reseal - CamryForums.com