Toyota Camry 1997-2001: Why is My Car Getting Bad MPG?
The Toyota Camry is known to have good gas mileage. If you notice an increase in your gas station visits, you may want to look for issues.
This article applies to the Toyota Camry (1997-2001).
The computer system's primary job is to precisely control the amount of fuel entering the engine to engage a process built on exact proportions. This is the process where the most complete burn occurs and water is formed as a by-product. The engine must work harder to achieve this ratio if it's restricted or if fuel is not completely burned. Sensors that relay false readings to the computer can completely reverse its thinking and create severe rich or lean conditions. It's important to find out the cause of your low fuel economy quickly as it's an indicator of a problem that may only get worse.

Materials Needed
- Tire pressure gauge
- Compressed air
- Basic tool set (ratchet, sockets, screwdrivers, and pliers)
- 6" extension
- Spark plug socket
- Vacuum gauge
- H.E.I. spark tester
- Scan tool (preferably with live data monitoring)
Have your Camry checked for trouble codes; these may point right to the problem. Most parts stores will give you a list of your codes for free.
Step 1 – Check the tire pressure
You could have low tire pressure.
On the driver's door or door jamb, you should see a sticker indicating the correct tire pressure levels. A tire with low air pressure increases rolling resistance and can reduce fuel economy up to five miles per gallon.
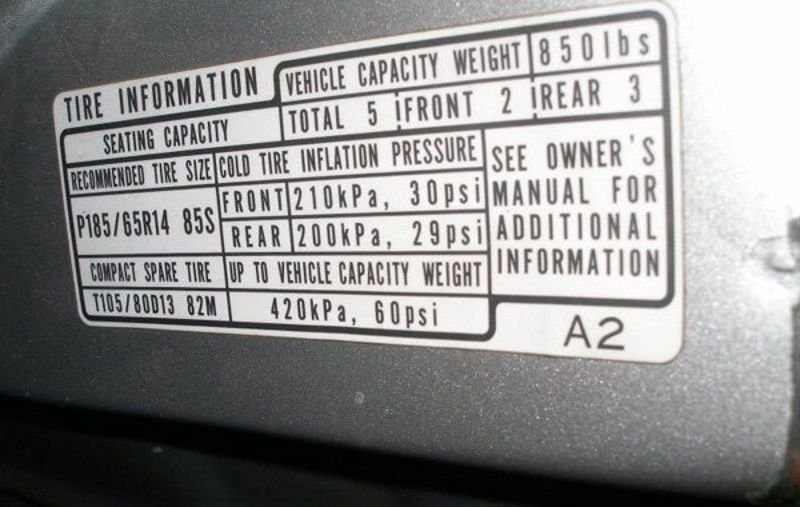
If the tire pressure is good, then proceed to Step 2.
Step 2 – Fill the fuel tank with new gas
You could have dirty fuel in your gas tank.
Sometimes you run into a bad batch of gasoline. The gasoline has either a high ethanol or water content, thus reducing fuel economy. Fill your tank with gas from another station. Try driving as much as you can to empty the gas tank before filling with new fuel.
If you know for a fact that the gas is good, then go to Step 3.
Step 3 – Check for an intake restriction
The breathing system may be choked up.
A clogged air filter will reduce fuel economy as air cannot efficiently make its way into the engine. This makes the engine work harder to produce the same amount of power. Remove your air filter and replace it if any dark areas are noted. It's recommended you remove the entire length of your intake piping up to the throttle body to be sure there is no debris along the path.

If the intake/filter is clean, then go to Step 4.
Step 4 – Check for an exhaust restriction
Your exhaust system may be clogged.
Catalytic converters and mufflers have been known to clog and create back pressure over time. Exhaust piping can get kinked when you encounter a bump in the road or hit an object.
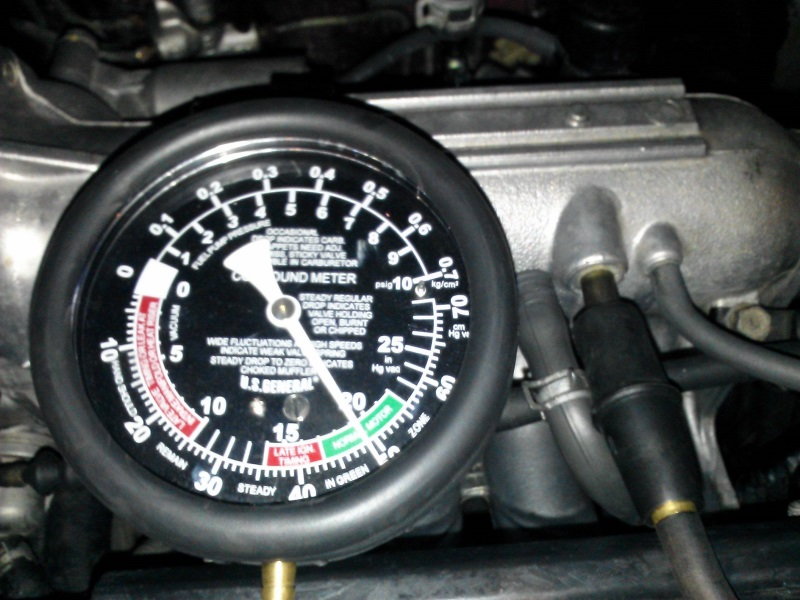
A simple way to test for exhaust back pressure is by using a vacuum gauge. You can hook the gauge up to a port off of the intake/intake manifold, or you can install a T-fitting into a vacuum line. Start the engine and record the reading at idle. Now raise the RPM to 3,000. The read should match or be greater than the idle reading. If the reading slowly drops, you may have an exhaust restriction.
If you would rather use an exhaust back pressure tool, you'll need to remove an oxygen sensor and install the gauge into its port. Start the engine; the pressure level should not rise above 2 PSI at idle. If all is well, raise the RPM to 2,000. Pressure should not exceed 3 PSI.
If the cats and exhaust are clear, then move to Step 5.
Step 5 – Your car is not shifting into overdrive
There could be a problem with your transmission's overdrive.
If you notice your RPM is higher than usual while cruising on the highway, your transmission's overdrive may not be working. Low fluid level/pressure can make this happen. A malfunction with an electrical sensor or solenoid as well as mechanical damage can cause this. A diagnostic trouble code will typically be set when this occurs.
Check the transmission fluid level by locating the red colored dipstick on the driver's side of the engine.
If the fluid level is normal, you way want to replace the transmission fluid filter. To replace it, you'll need to remove the transmission fluid pan.
If the transmission and fluid is good, then go to Step 6.
Step 6 – There's a problem with a sensor, solenoid, or wiring
The issue could stem from an electrical gremlin.
Sensors and solenoids, such as the coolant temp sensor, oxygen sensors, manifold absolute pressure sensor, and throttle position sensor, can relay incorrect readings to the computer. When the computer detects readings that are out of range, it will typically set a diagnostic trouble code. This is also true for solenoids such as the exhaust gas re-circulation valve.
The best course of action is to check for diagnostic trouble codes. A scan tool with live data monitoring can be used to check sensor values. For example, a throttle position sensor should show close to 0 volts with the throttle closed and about 4.5 volts fully open.

If all the scans and sensor values look good, then go to Step 7.
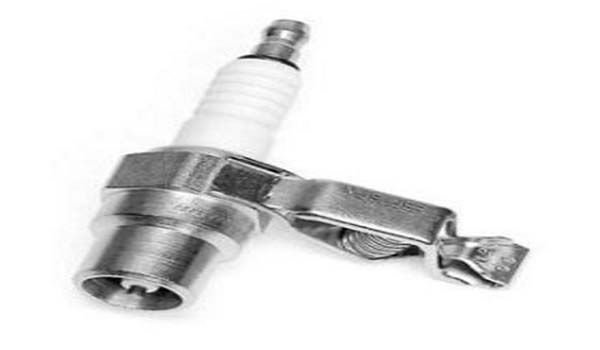
Step 7 – Check the ignition system
The problem could be from the spark plugs or coil packs.
If high amounts of resistance are present in the coil packs or spark plug wires, misfires can result. Sometimes the computer will not set a trouble code if the misfire is only minor. To check for proper operation of the ignition system minus the spark plugs, install a high energy ignition spark tester into the coil packs/spark plug wires. Ground the spark tester to the engine and start the vehicle. If spark is visible at each cylinder, remove your spark plugs. They will be light brown in color if correct combustion is occurring. Measure the spark plug gap and compare it to the specification in your owner's manual.
Related Discussions
- Burning Too Much Gas - Camryforums.com
- Sudden Drop Fuel Economy - Camryforums.com
- Camry XLE High Fuel Economy - Camryforums.com