Toyota Camry 2007-2011: How to Install Lowering Springs
Changing out your stock springs with some lowering springs can add some performance to the suspension of your car, and even make it look a bit better. But how low is too low? Here's how to achieve a lower stance, but still keep it drivable.
This article applies to the Toyota Camry (2007-2011).
So, you want to lower your Toyota Camry? Well, just like with any other vehicle, there is a right and wrong way to do so. In my opinion there is no point in lowering a road car unless you can keep the drivability that it has when stock. So usually this means that there is a maximum that you should lower your car. Most quality spring manufacturers will sell you a lowering spring that will lower your car 1-2". Anything over that and you are going to reach a point of diminishing returns.
In this article we will be talking about lowering your car using a basic spring kit that will be added to your existing strut. This is the entry level way to do so, and also the most cost effective. Of course there are other more complicated and costly ways, such as adding coilovers or air struts, but those are for a different article.

To install the springs, the process is as it would be if you were going to replace your stock springs, but in the place of the new stock springs you install the lowering spring of your choice. As always though, make sure you read and fully understand any instructions that come with the lowering springs that you decide to purchase. It is possible that the company who designed and manufactured them might have some special steps you need to perform for their kit.
Also, any time you raise and lower a vehicle, the suspension geometry of the vehicle is altered and will require a good alignment when finished. It will cost around $80 for an alignment.

Materials Needed
- Sockets sizes 10mm-22mm
- Ratchet
- Wrenches sizes 10mm-19mm
- Coil spring compressor
- Jack and jack stands
- Impact gun
- Allen or Hex wrenches sizes 5mm-8mm
- Torque wrench (foot pound)
- Hammer
- Punch
Before beginning, keep in mind that disassembling struts can be very dangerous. Your utmost attention must be given to ensure that all steps are done carefully and correctly. Also, the use of good quality tools is a must, as well as the proper and safe use of them. If you doubt your skills or abilities in any way, then this is not the task for you and you should consult with someone who is familiar with a task of this magnitude.
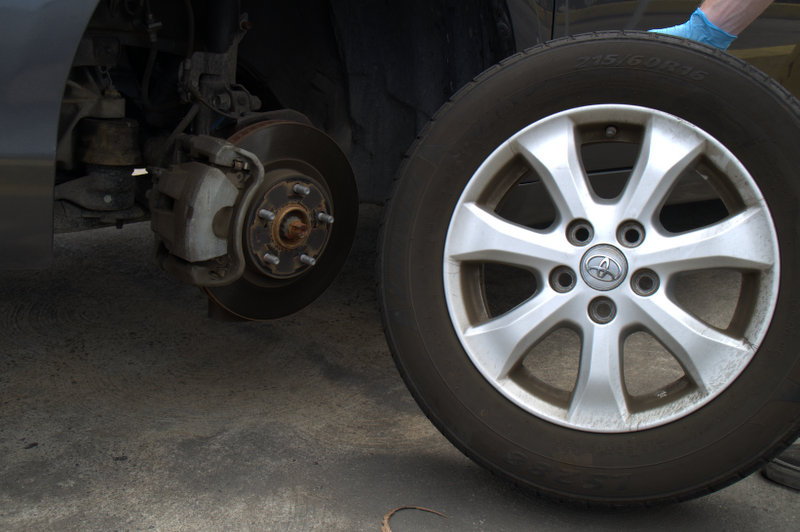
Step 1 – Put vehicle on jack stands and remove wheels
In order to access the strut assemblies the wheels of the vehicle must be taken off. You will be replacing both front and rear springs, so all of the wheels will need to be removed. Loosen the lug nuts while the vehicle is still on the ground, then jack the car up and place it on jack stands in order to get all four wheels to hang freely.
From here, this article will consist of three sections: removal and installation of the front strut assembly; removal and installation of the rear strut assembly, and removal and installation of the springs on both front and rear struts.
Step 2 – Remove the front strut assembly
To gain access to the springs, you will need to remove the front strut assembly as follows:
- Support the control arm (Figure 2) with a floor jack.
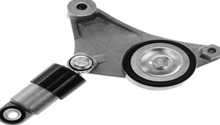
- Disconnect the stabilizer bar link end from the strut (Figure 3).

Figure 3. Front strut on 2011 Camry. 
Figure 4. Stabilizer bar link end.
- Remove the brake hose bracket and the speed sensor wiring harness from the strut.

- Remove the strut's knuckle nuts, and knock the bolts out with a hammer as well as punch.
- Separate the strut from the steering knuckle (Figure 5).
- Remove the three strut-to-shock tower nuts.
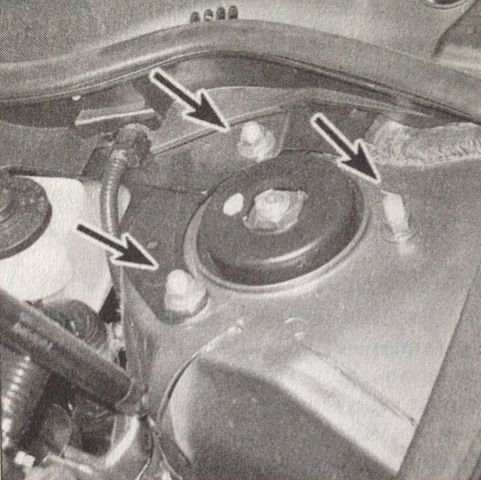
- Remove the assembly from the fender well.
- These removal steps for the front strut assembly will be the same for both sides.
- After you have swapped out the spring and reassembled the strut assembly, the installation of the strut assembly will be the reverse of removal.
Featured Video: How to Replace Front Struts
Step 3 – Remove the rear strut assembly
To gain access to the rear spring, you will need to remove the rear strut assembly as follows:
- Remove the rear seat and package tray trim panel.
- Remove the flexible hose and ABS speed sensor from the shock absorber.
- Detach the brake hose and ABS sensor wire from the strut.
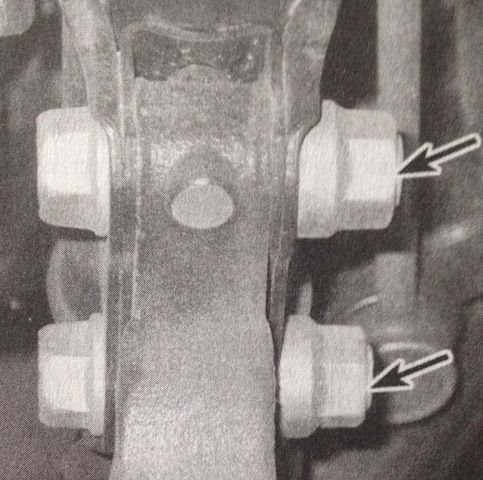
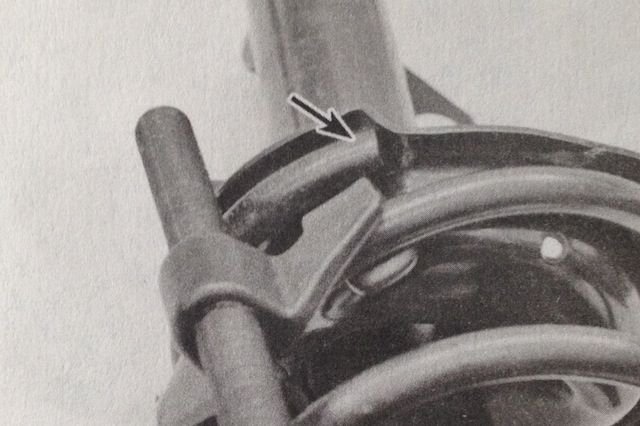
- Disconnect the stabilizer bar link (Figure 4) from the strut.

Figure 8. Rear strut assembly on base model Camry. 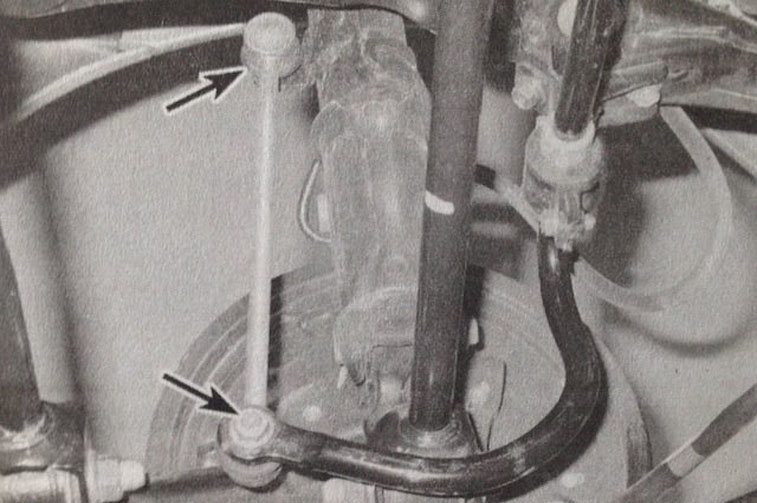
Figure 9. Rear stabilizer bar end link. The top arrow is where you want to disconnect it.
- Support the axle carrier with a floor jack.
- Loosen the strut-to-axle carrier bolt nuts.

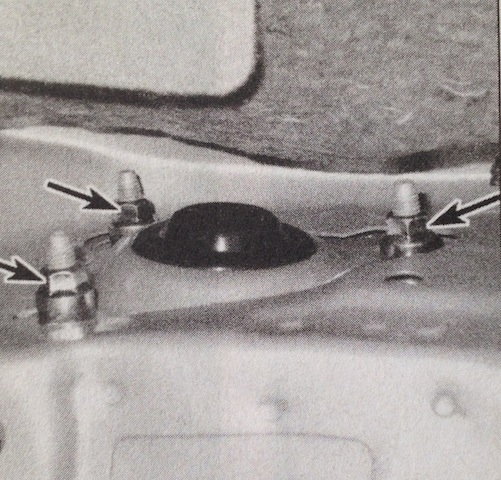
- Remove the three upper strut-to-body mounting nuts.
- Lower the axle carrier with the jack and remove the two strut-to-axle carrier bolts.
- Remove the strut assembly.
The steps will be the same for both sides. Again, after the spring has been swapped out and the rear strut assembly reassembled, the installation will be the reverse of removal.
Featured Video: Rear Strut Replacement
Step 4 – Strut disassembly and reassembly
In order to install your new lowering springs, you will need to disassemble the strut assembly and then reassemble it. You do that as follows:
Disassembly
- Install the spring compressor.

- Compress the spring sufficiently enough to relieve all pressure from the upper spring seat.
- Loosen the damper shaft nut.

- Remove the nut and suspension support.

- Inspect bearing in the suspension support for smooth operation. If it doesn't turn smoothly, replace it. Same goes for the rubber portion of the suspension support. If it's cracked or generally deteriorated, replace it.
- Remove the upper spring seat from the damper shaft.
- Check the spring seat for cracking and hardness.
- Remove the upper insulator from the damper shaft
- Carefully lift the compressed spring from the assembly and set it in a safe place.

- Slide the rubber bumper off the damper shaft.
- Check the lower insulator for wear, cracking, and hardness.
- Slowly remove coil spring compressor from old spring.
Assembly
- Install coil spring compressor on new lowering spring and compress spring.
- Carefully place the coil spring onto the lower insulator. Make sure the end of the spring rests in the lowest part of the insulator.
- Install the upper insulator and spring seat. Make sure that the flats in the hole of the seat match up with the flats on the damper shaft.

- Align the OUT mark of the spring upper seat with the mark of the upper insulator. If you are working on a front strut, make sure the arrow on the spring seat faces toward the lower bracket where the steering knuckle fits.

- Install the dust seal and suspension support to the damper shaft.
- Install the damper shaft nut. Final torque of the nut will be carried out with the strut installed onto the vehicle.
- Carefully remove the spring compressor tool.
Step 5 – Finishing up
With the struts reassembled with your new springs, it's time to re-install them into the vehicle.
- Insert the strut into the knuckle.
- Tighten down pinch bolts (65 ft./lbs.).
- Line up strut with strut tower and re-install the three top nuts to (18 ft./lbs.).
- Re-install sway bar end links (35 ft./lbs.).
- Refit wheels (85 ft./lbs.).
Lower vehicle down and take a test drive around the block, listening for any clunks, rattles or bangs. If everything checks out, drive your vehicle to the alignment shop, get everything set up, and then you are done.
Featured Video: How to Install Lowering Springs in Camry
Related Discussions
- DIY Replacing Struts - CamryForums.com
- TRD Lowering Springs - CamryForums.com
- TRD Spring Installation - CamryForums.com