Planning to change Timing Belt - Parts check needed


Thread Starter
|
Senior Member
Joined: Oct 2015
Posts: 425
1995 Camry v6 LE 240,000
I have probably placed more parts than I need but could someone please check what should be changed.. I am leaking oil there so those seals are needed.
I have no idea when the timing belt was changed hence my concern even though non -interference.
Also what after market do you suggest ASIN seems reliable since OEM is expensive. Thanks
Engine Timing Cover Gasket -11328-20020 Yes
Timing belt -13568-YZZ10 Yes
Engine Timing belt idler= 13503-0A010 ?
Engine Timing belt tensioner pulley - 13505-20010 ?
Tensioner Pulley – 13540-20021 ?
Waterpump (w/gasket)= 16100-29085 Yes
Engine Crankshaft seal = 90311-40022 Yes
Engine camshaft oil seal - 90311-38034 x2 Yes
Engine crankshaft rear main seal - 90311-A0027 Yes
Thread Starter
|
Senior Member
Joined: Oct 2015
Posts: 425
Thank You
I also looked at schematics and understand where it all goes now and yes the rear crank seal you remove the trans. That I will not do.
Here are some things I am doing based upon the manual and a you tube video I saw.
1. Bought a Lisle seal remover part 58430 for the camshaft seals since appear hard to remove.
2. Have an good electric impact wrench to remove crankshaft pulley bolt since that is hard to remove.
3. Buying a small cheap air ratchet socket wrench to remove the many small bolts to make it go faster..
4. Buying or rent a chain like device, don't know name that wraps around camshaft holding it in place so bolt can be removed and seal removed.
5. The crankshaft seal looks like he uses common tools to remove and install.
Question 1
I notice in all these videos he turn the crankshaft so it is TDC and therefore camhaft will also be TDC while belt and all connected before removing anything..
He removes tensioner, belt and all stay in place at the marks.
Always turn clockwise. .
How do they know whether its the up or down stroke. Do you pull no 1 cylinder plug and look in?
Question 2
I notice on the camshaft and crankshaft when installing the belt, he turns the camshaft and crankshaft separately counterclockwise to pick up the slack in the belt so it is tight. It still remains TDC when belt springs back. Is that correct?
Question 3
There is a seal installer for cam shaft but not sure I need it and may be able to push it in myself or rent the tool.
In ordering and planning stages so thanks for input.
Last edited by wdc123; Sep 5, 2020 at 09:38 AM.
Thread Starter
|
Senior Member
Joined: Oct 2015
Posts: 425
Before starting this task I thought I would unscrew part of the timing belt cover, right camshaft, and look at timing belt.
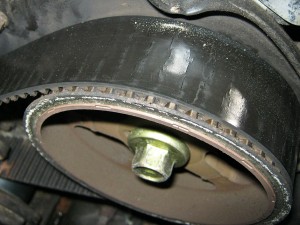
The outside has multiple cracks along the outside of belt and as a far as I can see it continues throughout belt. Not totally surprised but first time I have seen a belt so visible to the eye with cracks on outside. If you measured a few inches of belt, that area alone would have 4-8 visible cracks.
Bought car in 2013 with about 150000 ( no receipt of when timing belt installed) and now has about 230,000 so thinking it has not been changed in a long time. At least not changed in about 8+ years. I do know previous owner maintained the car but before I bought it it had been sitting for a few years with only occasional driving.
I think I have been lucky and car will stay in garage until work is started and completed.
Example picture from internet.
Last edited by wdc123; Sep 7, 2020 at 09:17 PM.

Super Moderator
Joined: Jan 2008
Posts: 15,179
From: PTW
Toyota has a special hand held tool that holds the cam pulley still. You can make said tool using a metal bar or section of wood having two long bolts sticking out from it. The two bolts engage holes in the pulley while the hand holds the extension of the bar.Question 1
The cam pulleys will have marks indicating when the No 1 cylinder is at TDC on compression stroke.
Question 2
Its possible when the tensioner is released that the cam pulleys can rotate. That’s why once the belt is installed and tensioner is released the crank is rotated 2 times back to TDC and the marks rechecked.
Question 3
Installing seals may be challenging because of lack of space in front of the seal preventing the use of a hammer and mandrel. You can fabricate a tool from PVC pipe that uses the cam bolt threads and a bolt to pull the pipe (having a cap with a hole in it for the bolt) onto the seal outer metal ring then into the cam seal hole.
Just change the belt. They are good for 60-90K depending on the year of car.
Obtain a white or black pen that can write on metal. With cams/crank aligned at TDC on the No 1 cylinder compression stroke, prior to removing the belt mark everything you might need to put the belt back on in the correct position. Take pictures of needing to.
Thread Starter
|
Senior Member
Joined: Oct 2015
Posts: 425
Made some good headway today.
Raised car, put on jack stand stands with blocks on rear.
First powerwashed all the oil off. Took a while from years of dirt and oil and used deghreaser.
Remover overflow tank, power steering reservoir
Alternator belt
Underside to get at crank case.
Engine support
Screws on upper timing cover
Could not remove 22 mm bolt from crankshaft,
Tried 18 V Impact , nothing then 600 foot lbs 1/2 inch air impact, nothing.
Looked at video and they use a 22 mm Harmonic Balancer Socket lisle so going to buy it.
Super Moderator
Joined: Jan 2008
Posts: 15,179
From: PTW
Crank bolt torque is something like 159 ft lbs.
An impact wrench can not be effective.
Get a LARGE breaker bar such as a 3/4 inch drive from Harbor Freight (low cost). Use their adapter (low cost) to reduce the drive size to 1/2 for the socket. Then get a section of pipe to use a force multiplier. If you are not using one already, fabricate a device to hold the pulley stationary at the inner pulley. The pulley has threaded bolt holes to attach a tool to that has an arm. The tool bolts to the pulley and the arm can be wedged against the chassis..
Thread Starter
|
Senior Member
Joined: Oct 2015
Posts: 425
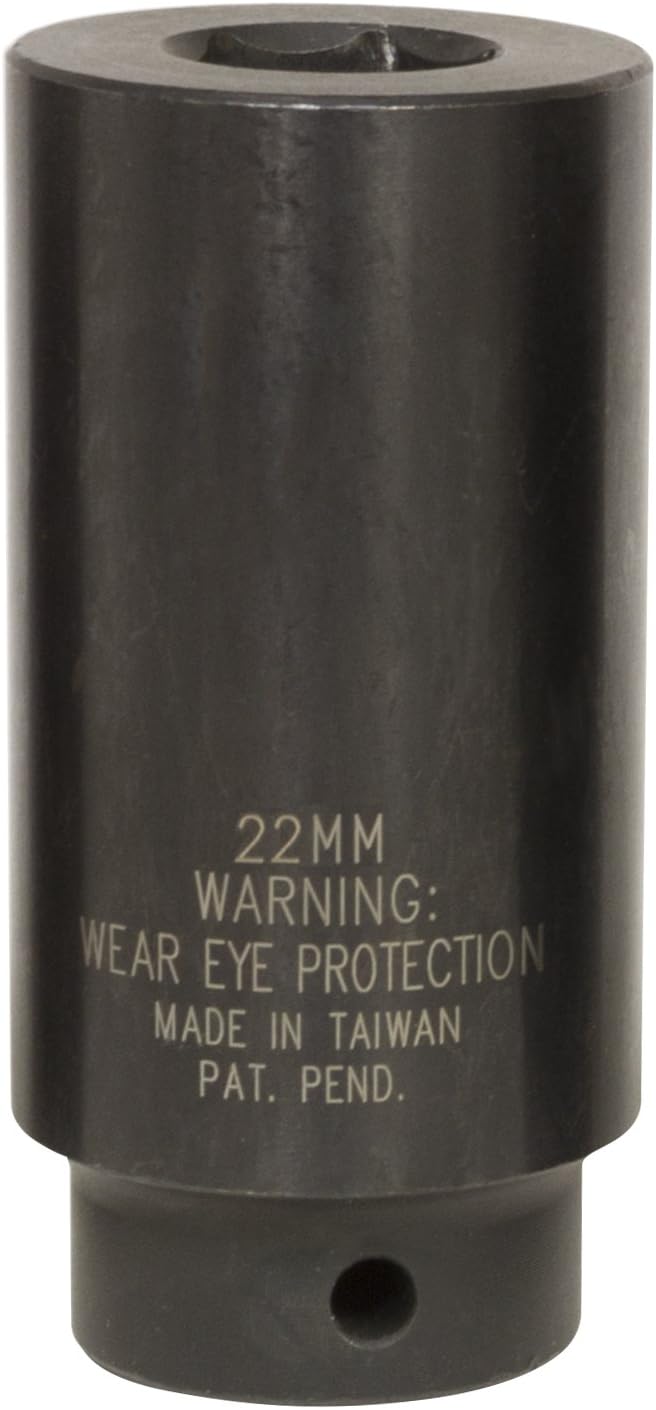
Just removed harmonic balancer bolt. As said before used 18 V Impact wrench with 22 mm impact wrench socket and did the same with 1/2 inch impact wrench with 600 ft/lbs torque. Your suggestion is good but had already bought this new impact socket.
Now used Lisle 77110 22 mm Harmonic Balancer Socket. Amazon $26.00. Picture from Amazon. Next day ship. Would not turn with 18 V Impact but spun off in 5 seconds with air impact. Will keep you posted. It is a solid socket hence gives the air impact more torque.
Now used Lisle 77110 22 mm Harmonic Balancer Socket. Amazon $26.00. Picture from Amazon. Next day ship. Would not turn with 18 V Impact but spun off in 5 seconds with air impact. Will keep you posted. It is a solid socket hence gives the air impact more torque.