Toyota Camry 2007-2011: How to Install Exhaust Tip
Often times, it's the little details that make the biggest difference, so find out what you can do to spruce up your Camry.
This article applies to the 6th generation Toyota Camry (2007-2011).
When Toyota designs a new car to go into production, this highly-rated automotive manufacturer has to figure out more and more ways to increase revenue. One of those ways is by creating multiple trim level of the same car and adding bits or pieces of trim to make the car look better, fancier, but most of all—more expensive. Sometimes, those tiny bits can be something as simple as a chrome or stainless steel exhaust tip, which not only adds a level of flair and style to your Camry, but covers the plain and naked factory exhaust tip. Read on for the easy steps on how to install an aftermarket exhaust tip.

Material Needed
- Phillips or flat head screwdriver
Step 1 – Prep the exhaust tip
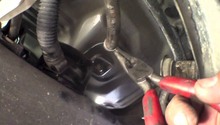
The rear-facing end of your aftermarket exhaust tip has a hose clamp that is secured by either a Phillips or flat head screw. First use a screwdriver to loosen the screw, so the exhaust tip can gently slide onto the tailpipe.

Step 2 – Install the exhaust tip
With the hose clamp open, carefully slide the exhaust tip onto the tailpipe, making sure that the tip is straight and facing the right way. Once the tip is positioned correctly, tighten the hose clamp to secure it to the tailpipe.

Pro Tip
Make sure the exhaust pipes are cool before attempting to install the exhaust tip.
Related Discussion
- Toyota Camry Muffler Tip - CamryForums.com