

 Aug 25, 2015, 06:42 PM
Last edit by: IB Advertising
See related guides and technical advice from our community experts:
Browse all: Lighting Guides
- Toyota Camry 4th gen How to Replace Console Lights
Step by step instructions for do-it-yourself repairs
Browse all: Lighting Guides

1997-1999 Camry Gen 4 HVAC bulb replacement DIY

Thread Starter
|
Junior Member
Joined: Apr 2011
Posts: 24
From: Southern カリフォルニア
This is for your HVAC (Center console) bulb replacement DIY
I believe this is the only DIY on how to change your bulbs for the center console for the Gen 4 (1997-1999) camry with **** dials.
Well here we go. It's quite easy. Doesn't take no more than 10 minutes total if you're good at taking off the panel and unscrewing some parts. :lol:
Tools:
Smallest flathead screwdriver you have available.
Phillips Screwdriver
I got my LEDs at superbrightleds.com
Bulb types:
74
Super Bright LEDs - Miniature Wedge Base Bulbs
You need two 74-xHP3 LED bulbs for the brightest 360 degree dispersion if you want it bright.
Twist-lock type.
Super Bright LEDs - Instrument Cluster and Gauge Backlights
You would need 2 NEOx 4mm and 1 NEOx 3mm.
That's about all the bulbs you'll need. 5 total if you want to do the whole thing. But if you only want to change out the AC controls bulb, you only need 2 74 bulbs.
NOTE: You don't need to unplug your battery for this but if you want to be extra safe, go for it. I did this without unplugging my battery only because I needed to check during installation if I put the bulbs in correctly. Saves time you know.
Okay onto the DIY.
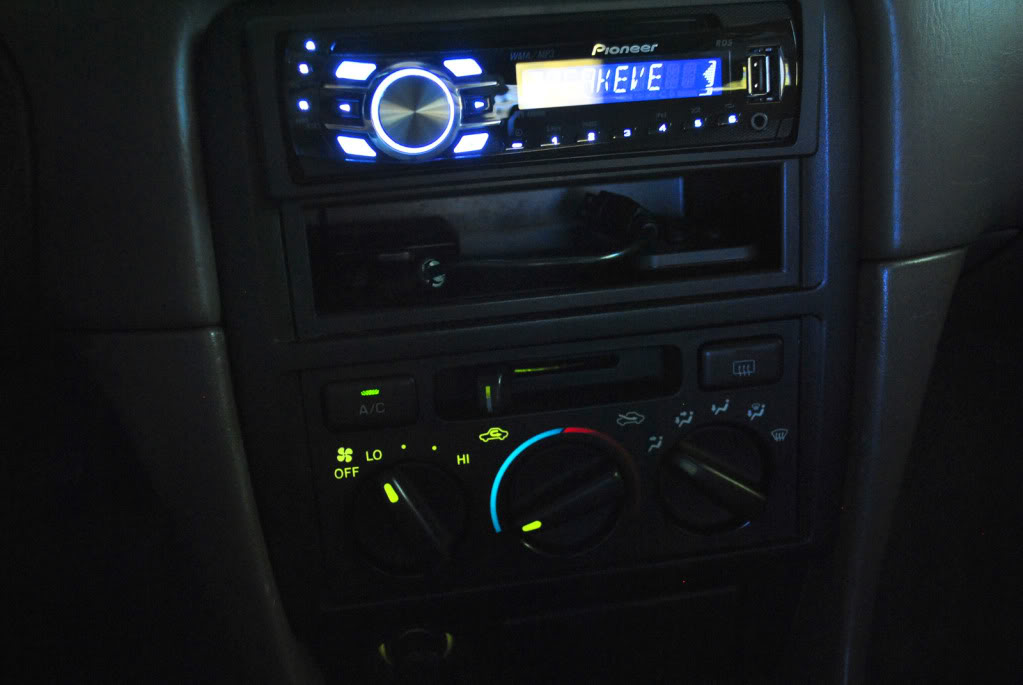
This is before. Ugly green bulb.
1.
Take out the panel around the shifter. Pretty easy if you have manual but get's tricky with automatic. Unplug the adapter to your 12v outlet
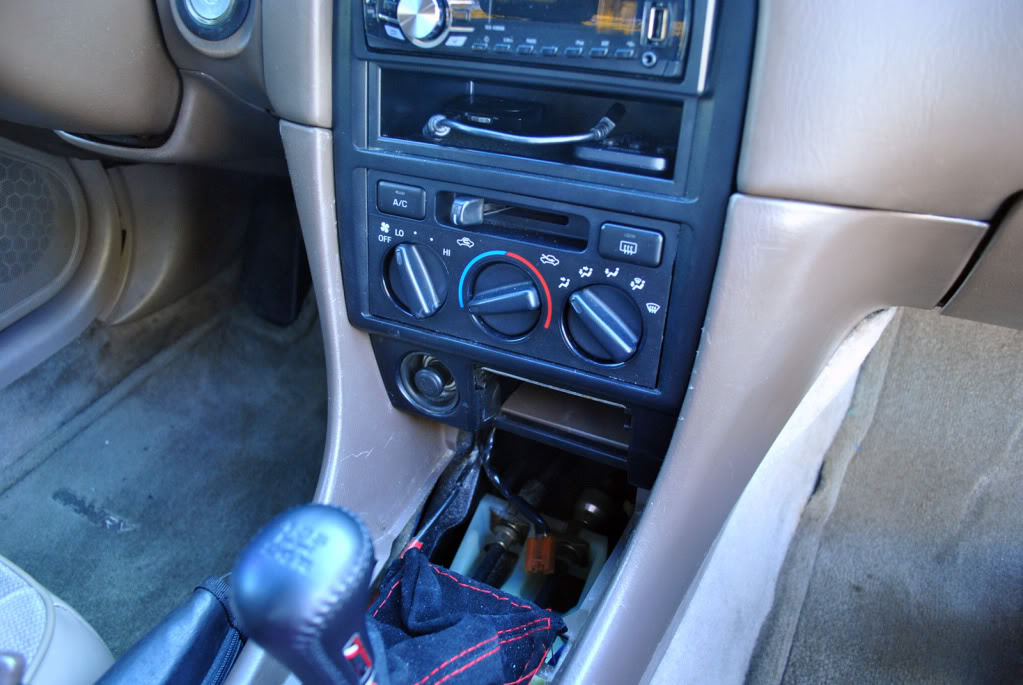
2.
Take out the center console panel. You might need a flathead screwdriver to help pry the clips out.
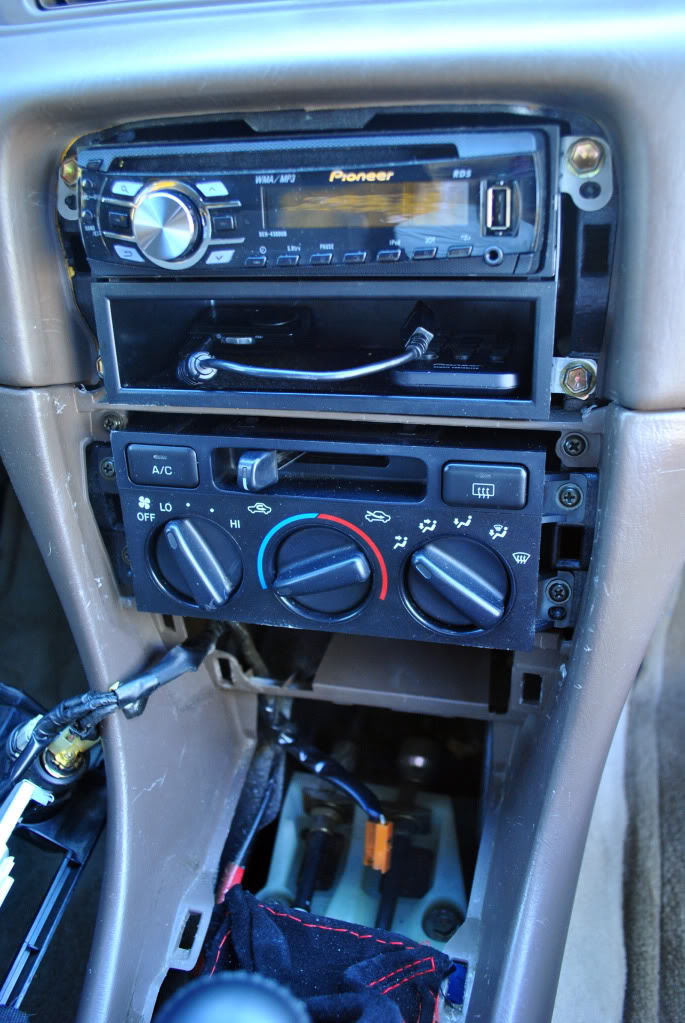
3.
With your Phillips screwdriver, just unscrew the four screws on the corners.
4.
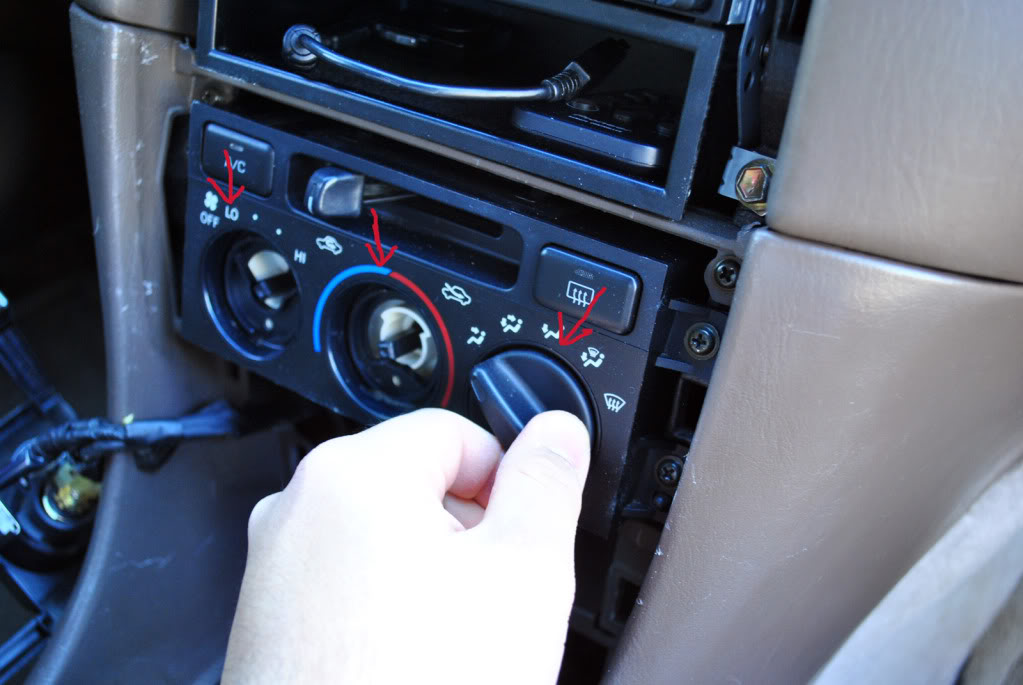
Before you pull the whole thing out, make sure you pull out the ***** first. It's pretty easy. Just grab and pull out. If you can't do it by hand, get some pliers with a rubber grip and pull them out.
5.
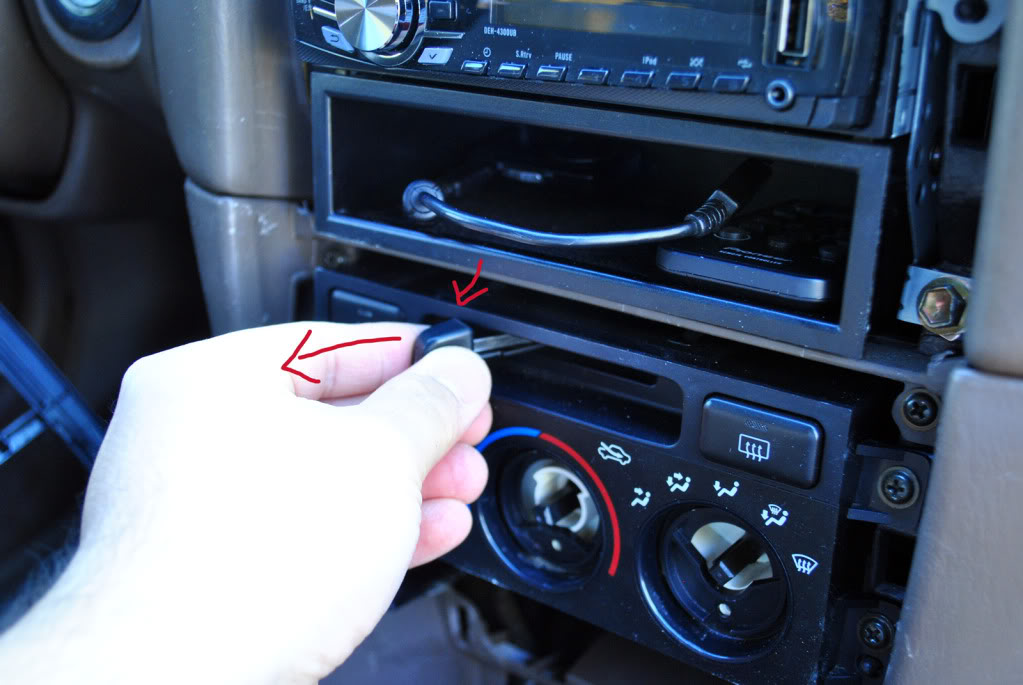
Same thing goes with the AC vent shaft. Just pull out the head.
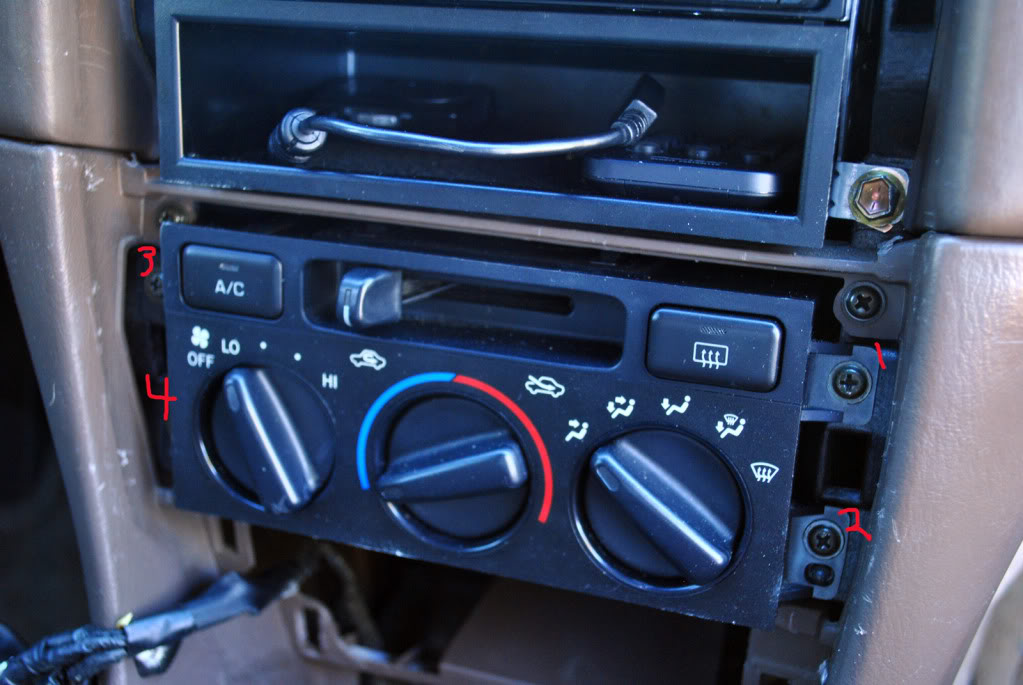
6.
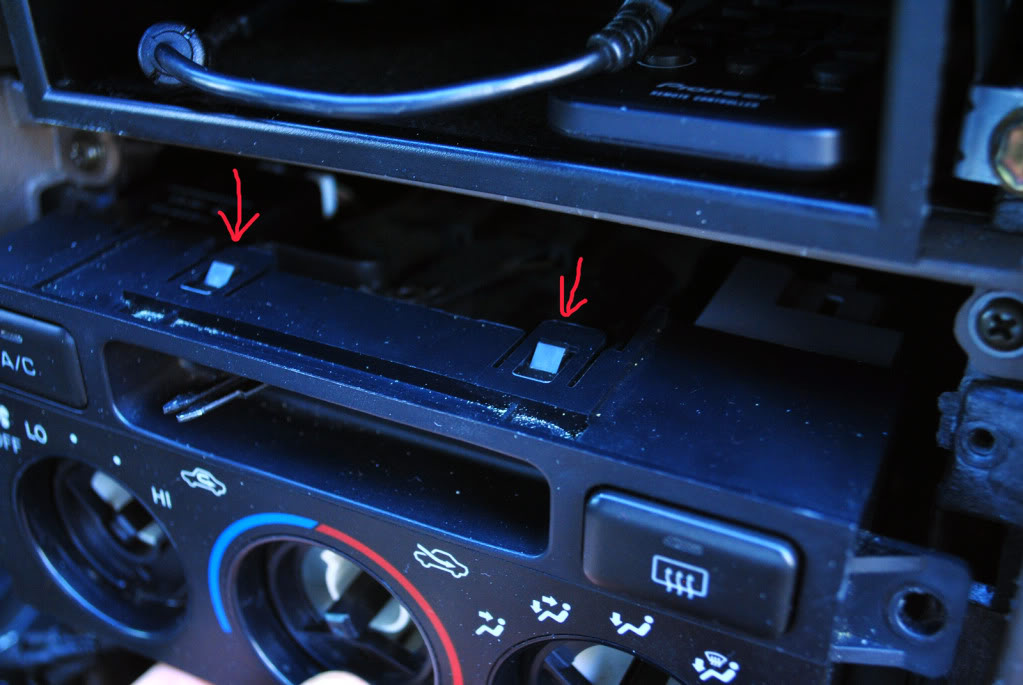
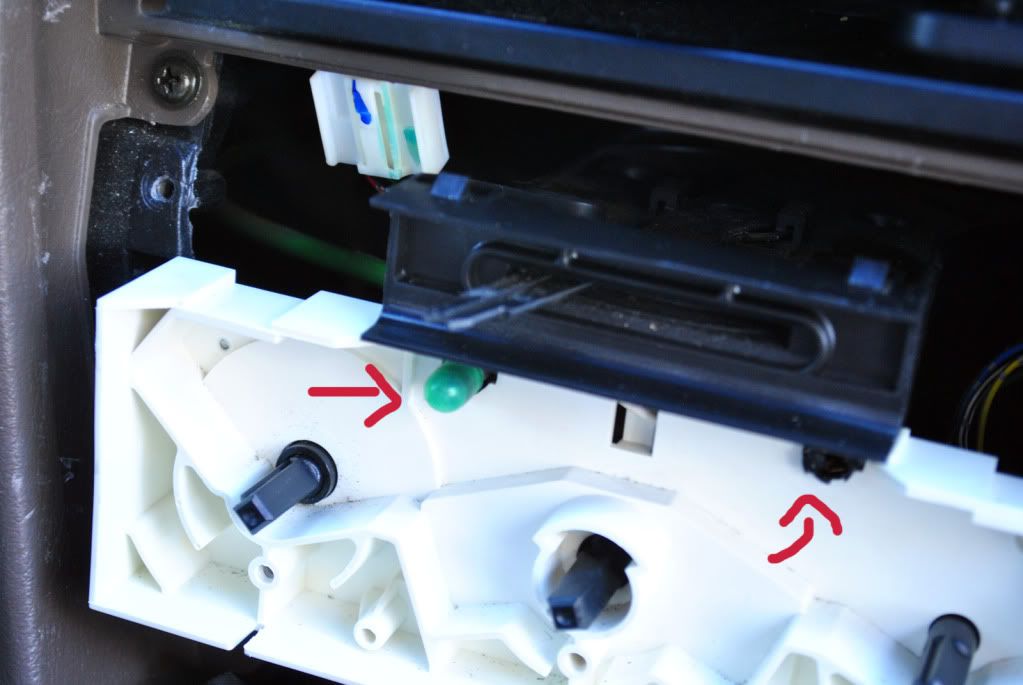
Once you pull it out gently, there are two clips holding the controls in place. Using your fingers, you can easily lift up the tabs and pull it out.
7.
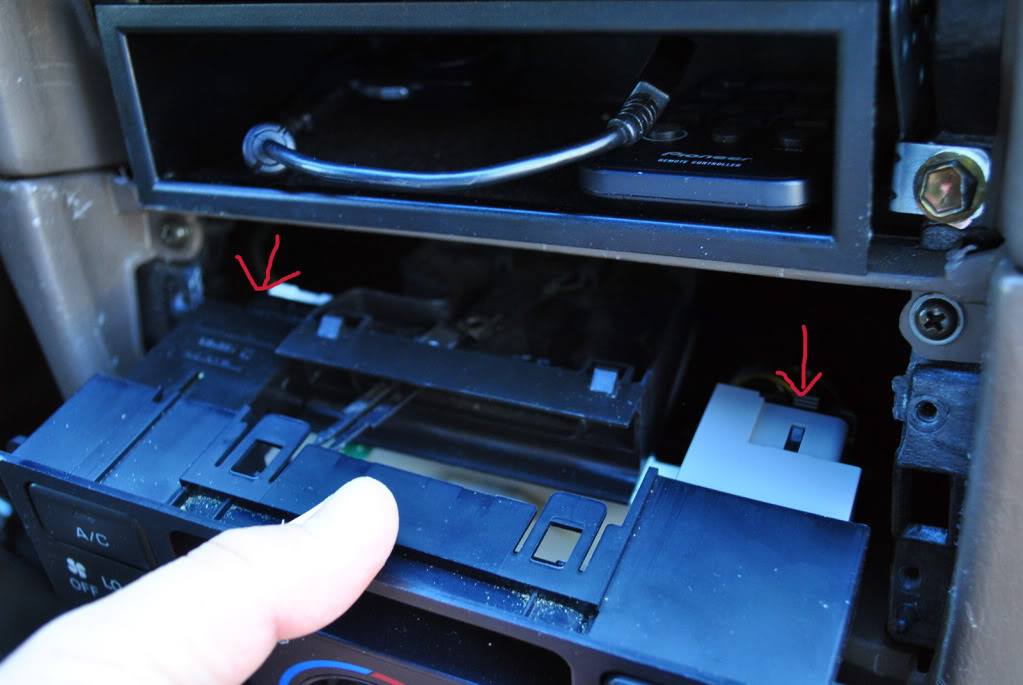
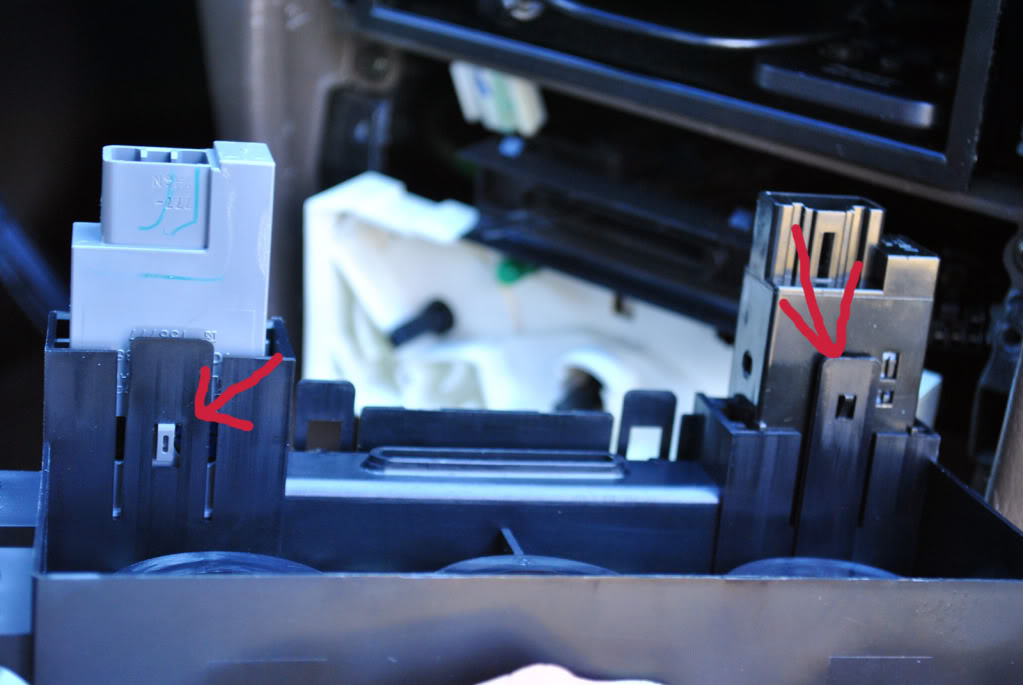
Once you've pulled it out, your defroster and AC button cable connectors will come out. You need to unplug them in order to get the control hub out.
8.
After you've done that, the bulbs for the main center console will be available. This is pretty easy. All you have to do is pull the bulb out. No need to unscrew the outlet and all. It's a wedge type so just pull them out.
9.
To change the bulbs for your AC and defroster buttons, they are clipped onto the center console hub. They're easy to pull out, there is a tab under it and you can just lift the tab up to pull them free.
10.
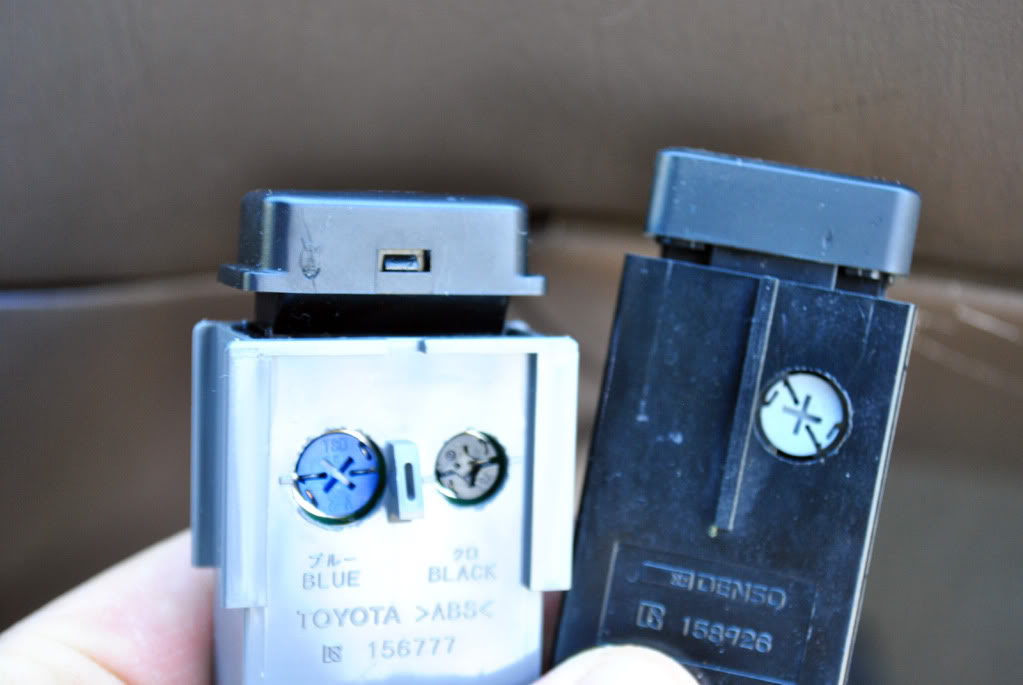
The defroster has two bulbs as the AC only has one. The AC uses the NEOx 4mm led. I picked white as it doesn't matter what color you pick because there's a green film behind the little plastic cover. But for the defroster there are two. The orange light bulb can be changed to a NEOx 4mm LED bulb and the smaller one uses the NEOx 3mm. Use a screwdriver to unscrew it and then start prying them out little by little so that you won't break anything. After you've taken them out, put your new bulbs back in the same way, you don't need to screw it completely, just slightly until it stops moving.
11.
After you're done installing all the bulbs, just put everything back in reverse order. It's pretty basic.
12.
This is the finished look. I chose cool white as I like it to match with my head unit. It's cleaner and way brighter than that ugly OEM green. I also didn't change the bulb for my defroster since I got the wrong size bulbs. I'll post those once the correct size come in.
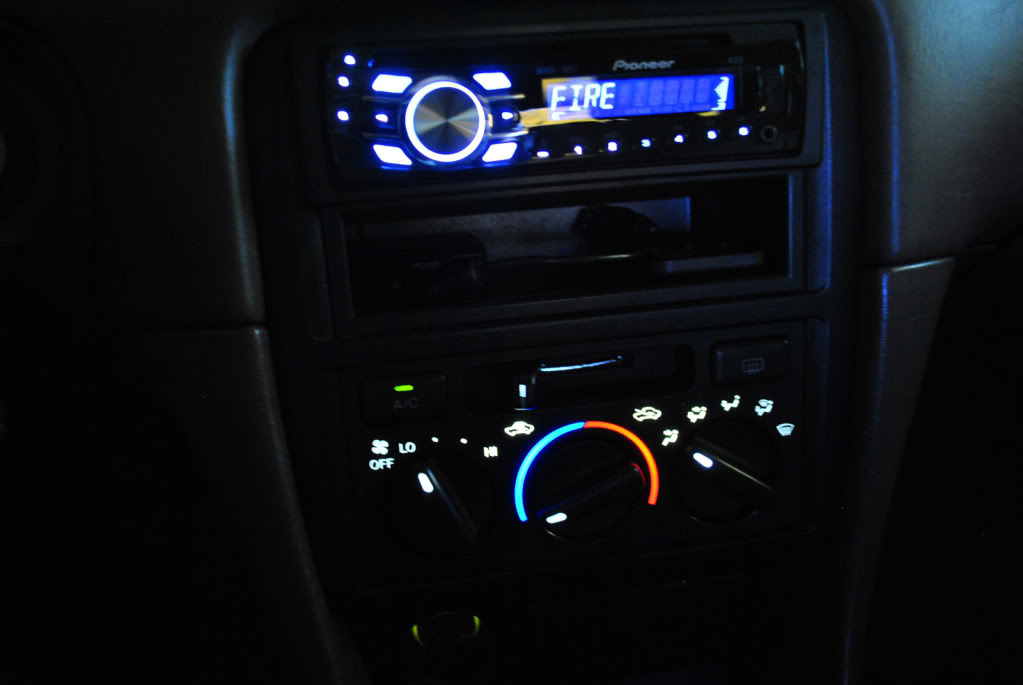
The light for the cigarette lighter is different. I need to find out what type of bulb that is but that's for a later time.
Well cheers. Hope this helped you guys out a lot.
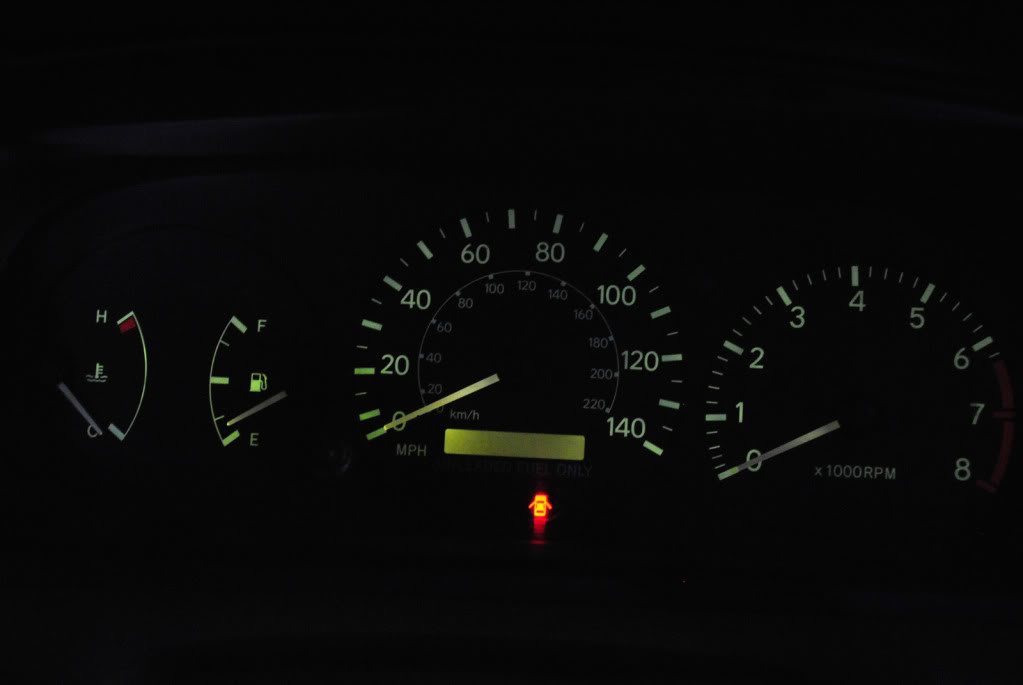
I also replaced the bulbs in my clusters as well.
Before
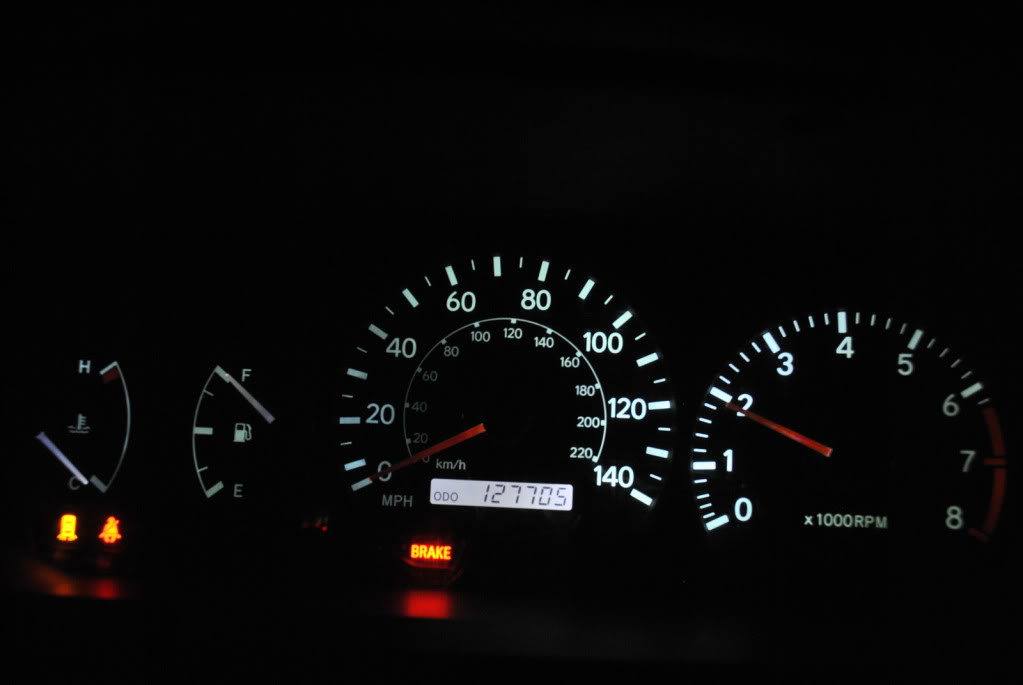
After
I believe this is the only DIY on how to change your bulbs for the center console for the Gen 4 (1997-1999) camry with **** dials.
Well here we go. It's quite easy. Doesn't take no more than 10 minutes total if you're good at taking off the panel and unscrewing some parts. :lol:
Tools:
Smallest flathead screwdriver you have available.
Phillips Screwdriver
I got my LEDs at superbrightleds.com
Bulb types:
74
Super Bright LEDs - Miniature Wedge Base Bulbs
You need two 74-xHP3 LED bulbs for the brightest 360 degree dispersion if you want it bright.
Twist-lock type.
Super Bright LEDs - Instrument Cluster and Gauge Backlights
You would need 2 NEOx 4mm and 1 NEOx 3mm.
That's about all the bulbs you'll need. 5 total if you want to do the whole thing. But if you only want to change out the AC controls bulb, you only need 2 74 bulbs.
NOTE: You don't need to unplug your battery for this but if you want to be extra safe, go for it. I did this without unplugging my battery only because I needed to check during installation if I put the bulbs in correctly. Saves time you know.
Okay onto the DIY.
This is before. Ugly green bulb.
1.
Take out the panel around the shifter. Pretty easy if you have manual but get's tricky with automatic. Unplug the adapter to your 12v outlet
2.
Take out the center console panel. You might need a flathead screwdriver to help pry the clips out.
3.
With your Phillips screwdriver, just unscrew the four screws on the corners.
4.
Before you pull the whole thing out, make sure you pull out the ***** first. It's pretty easy. Just grab and pull out. If you can't do it by hand, get some pliers with a rubber grip and pull them out.
5.
Same thing goes with the AC vent shaft. Just pull out the head.
6.
Once you pull it out gently, there are two clips holding the controls in place. Using your fingers, you can easily lift up the tabs and pull it out.
7.
Once you've pulled it out, your defroster and AC button cable connectors will come out. You need to unplug them in order to get the control hub out.
8.
After you've done that, the bulbs for the main center console will be available. This is pretty easy. All you have to do is pull the bulb out. No need to unscrew the outlet and all. It's a wedge type so just pull them out.
9.
To change the bulbs for your AC and defroster buttons, they are clipped onto the center console hub. They're easy to pull out, there is a tab under it and you can just lift the tab up to pull them free.
10.
The defroster has two bulbs as the AC only has one. The AC uses the NEOx 4mm led. I picked white as it doesn't matter what color you pick because there's a green film behind the little plastic cover. But for the defroster there are two. The orange light bulb can be changed to a NEOx 4mm LED bulb and the smaller one uses the NEOx 3mm. Use a screwdriver to unscrew it and then start prying them out little by little so that you won't break anything. After you've taken them out, put your new bulbs back in the same way, you don't need to screw it completely, just slightly until it stops moving.
11.
After you're done installing all the bulbs, just put everything back in reverse order. It's pretty basic.
12.
This is the finished look. I chose cool white as I like it to match with my head unit. It's cleaner and way brighter than that ugly OEM green. I also didn't change the bulb for my defroster since I got the wrong size bulbs. I'll post those once the correct size come in.
The light for the cigarette lighter is different. I need to find out what type of bulb that is but that's for a later time.
Well cheers. Hope this helped you guys out a lot.
I also replaced the bulbs in my clusters as well.
Before
After

Junior Member
Joined: Oct 2011
Posts: 1
Thanks for the great info on how to change these lights!! FYI..I found this post on changing the "cigar light in the 1999 Camry" of all things a tundra board
Cigar Lighter bulb cannot change out, 99 Camry?
Cigar Lighter bulb cannot change out, 99 Camry?

Junior Member
Joined: Dec 2012
Posts: 1
my first post here......
I know this thread is more than a year old but i just had to reply.
i would like to thank the op "XPEED" enormously for posting the pics and explanation on replacing bulbs in the HVAC. my Camry wagon was built June 2001.........the pics in the thread are EXACTLY the same as my car's HVAC center consle. However, when i went to gently pull the front bezel off after lifting the two top tabs up (SEE PICS 6 and 7 in XSPEED'S post above), it wouldn't shift forward ! i then noted that the design of my front cover on the top where the 2 tabs are, is differant to that shown in the pic above. I FOUND 2 extra release tabs at THE SIDES (one each side)........so that's 4 "release tabs" to be lifted in total, THEN one can slide the cover off exposing the 2 main green coloured bulbs
one of those green bulbs has been DEAD on my car for more than 5 years (the righthand one).....so now i can replace it ! EEHAAAAA !
would my Camry wagon be Gen 4.5 ?
thanks again XPEED
Last edited by JackDog; Dec 17, 2012 at 05:44 PM.
Thread Starter
|
Junior Member
Joined: Apr 2011
Posts: 24
From: Southern カリフォルニア
You're welcome. Glad to know this was helpful and sorry to say, I no longer have the Camry. It was time to move on but if you have any other questions regarding your camry, let me know and I'll try my best to help you out.


Thread
Thread Starter
Forum
Replies
Last Post
dcemureviews
DIY - Do It Yourself
0
Jun 5, 2009 10:57 AM