

 Aug 26, 2015, 01:10 PM
Last edit by: IB Advertising
See related guides and technical advice from our community experts:
Browse all: Brakes
- Toyota Camry 6th gen How to Repair and Replace Parking Brake
Step by step instructions for do-it-yourself repairs.
Browse all: Brakes

A140 transmission repair

Thread Starter
|
Member
Joined: Jan 2010
Posts: 44
Read through first and make sure you are comfortable with attempting this repair or diagnosis. Prior transmission work would be a good idea.
Before starting, be sure you have a clean area to perform this repair.
**KEEP EVERYTHING IN ORDER AND KEEP THE GRABBY ASSISTANT OR NEIGHBOR'S HANDS OFF OR SOMETHING WILL GET SCREWED UP!**
It may be possible to perform this without draining all the fluid since you really don't need to remove the pan, but it would most definately prevent any spills should the transmission become tipped in the wrong direction.
PARTS LIST from www.wittrans.com
Qty: 4 WA67106C FRI. A140/A240 DIRECT/O. 2.08ea.
Qty: 4 WA67122A STEEL. A130/A140/A240 FO 1.41ea.
Total for replacing this clutch set was $28.96 shipped to my door. Depending on which set is bad, they list inside or outside diameters of parts as well as teeth counts, so if different clutches are bad you should be able to find the ones you need on there for roughly the same price.
All in all a car can be possibly taken from junk to repaired for under $30 in a weekend.
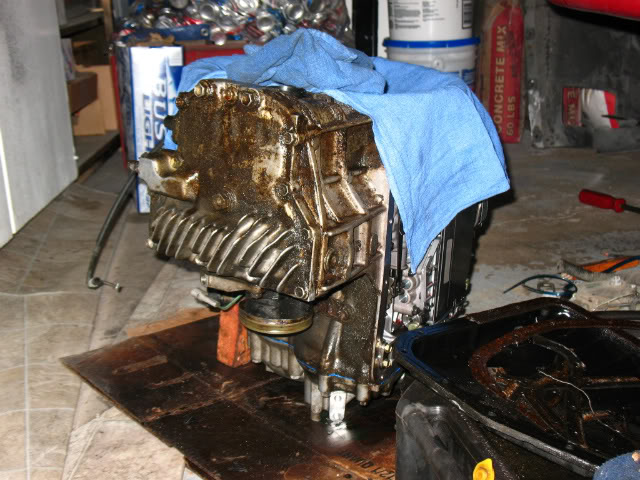
Before removing transmission: Wash down transmission as best you can. Drain fluid.
After removing transmission:
1. Pull off torque converter and drain differential if you cannot plug the drivers side hole on the differential.
2. Stand transmission up so the pump is pointing up(Pump is behind the torque converter).
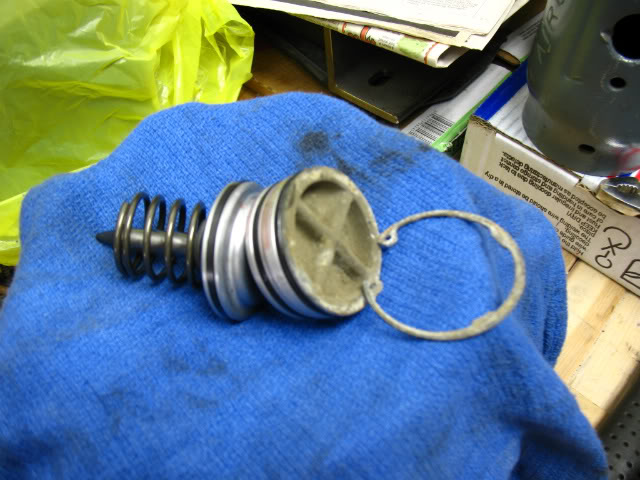
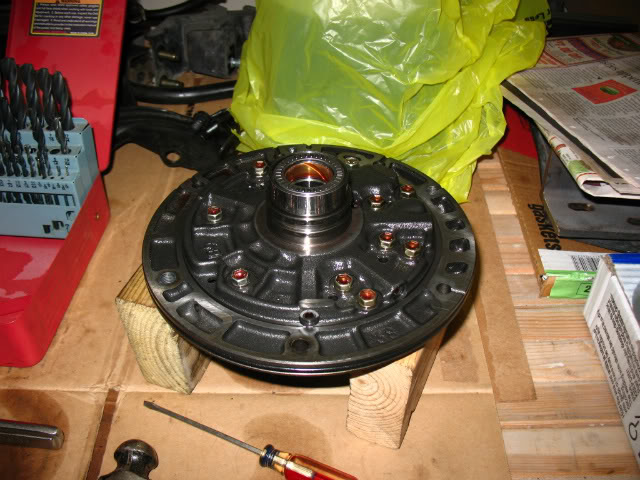
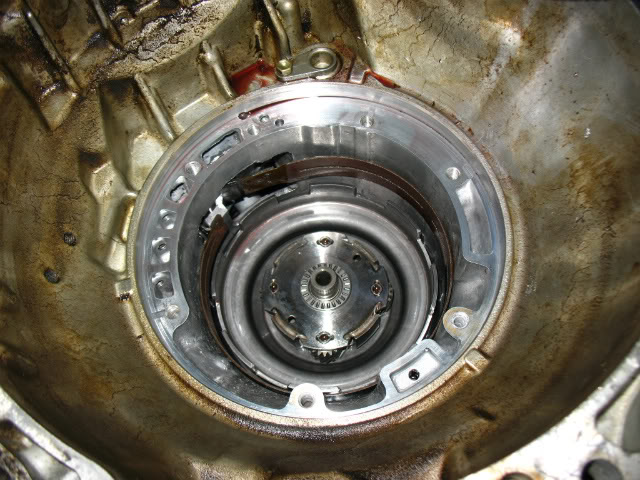
3. On the side of the case behind the cooler lines you will see a round recess with an X in it.

Make sure there is not a lot of dirt on it. Remove the internal snap ring. It may require a few light taps with a punch to loosen it, but you should be able to use a pair of pliers and twist/lift it from the case. This is the band apply piston. Pull out the piston and spring. Keep them in order of removal
(large spring->piston->cover->snapring)
4. Take all the bolts loose holding the pump in.
You'll need to use two of the bolts(14mm head) that bolt the trans to engine block. You'll see two holes that are threaded on the pump.
Carefully screw the bolt in by hand until it stops. **CAREFULLY** give
each bolt a turn to pull the pump out of the case. It should not require much pressure to pull remove the pump.
5. Set the pump aside after removal with the outside facing down because you'll be setting the following parts on top of it to keep them in order.
6. The band should now be loose enough to remove first hub assembly and set it on top of the pump.
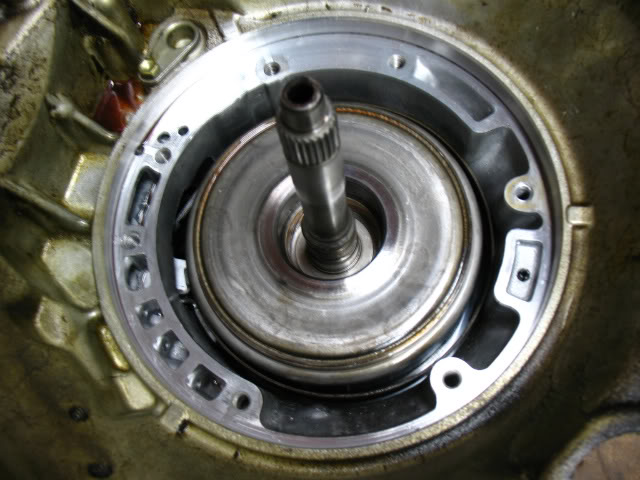
Be sure to keep it's orientation the same with the pump(closed end towards pump). Inspect the frictions and steels in this hub. They should be a tan or very light brown in color. When we get to the second hub I'll explain in more detail looking at the the clutch frictions/steels.
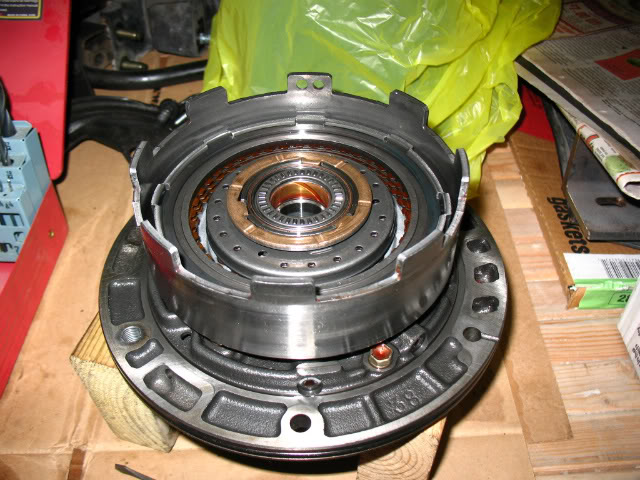
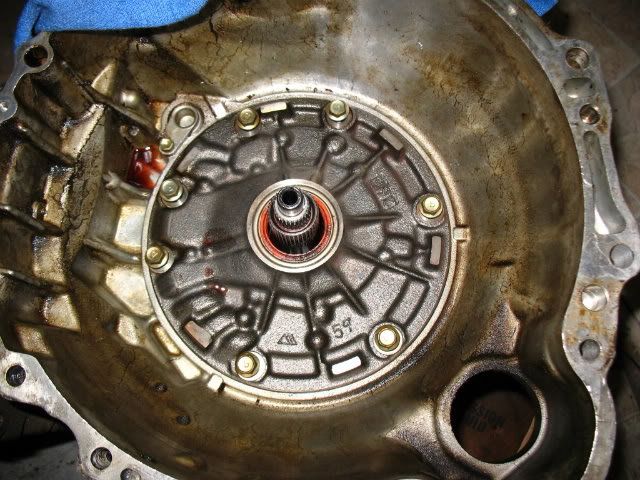
7. The next hub assembly will contin another clutch pack. This was burned up on this particular transmission.
At this point you should be left with the case looking like this and all clutch packs should be removed except for the one in the end of the case.
I looked at that one first and it was tricky getting the cover back on. If you've looked through everything and it all looks good you can take a look inside there. I'm not going to get into looking at that because you just remove all the bolts and it lifts off. The cover sets back on, but a lot of wiggling/jiggling and praying gets it back on in a timely manner.
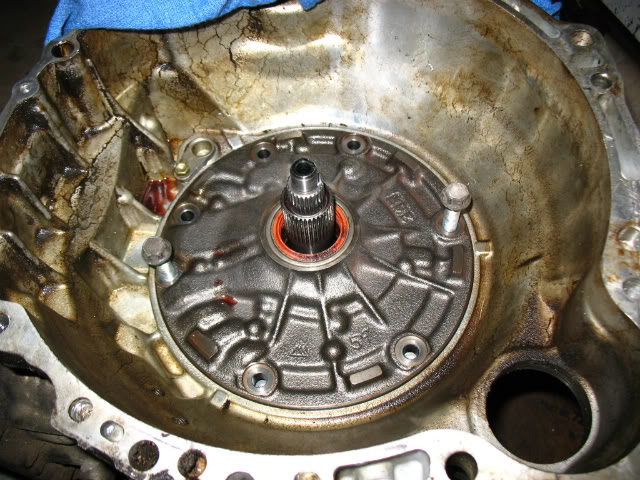
1. After locating burned clutch pack, remove snap ring in order to access frictions and steels. Make sure you keep them in order because some steels are thicker than others. These are the pressure apply plates.

For reassembly, perform steps above in reverse order. Document the work you do if you feel you may not remember how to put things back together.
When putting the hubs back into the transmission you'll need to use a twisting motion in order to get the frictions into alignment. You must make sure everything is completely seated together or things will not fit back together. You should not need to use any force other than gravity to get things back together. When you get to the point of installing the pump, you'll need to lube the seal around the pump and gently push it into the case. Making sure the bolt holes line up correctly hand start the pump bolts into the case if possible. You'll then need to sequentially use the pump bolts to slowly draw the pump back into the case. If at any time a bolt becomes hard to turn STOP and investigate the problem. When the pump is fully seated and the pump bolts tightened(roughly 20 ft-lb.). You should be able to turn the small input shaft after the bolts are torqued. If not, something may not be right and you need to double check that everything is installed correctly.
You can now make sure the torque converter is full of fluid and carefully install it in the transmission. MAKE SURE THE CONVERTER IS COMPLETELY IN AND ENGAGED WITH THE TANGS ON THE PUMP.
Before starting, be sure you have a clean area to perform this repair.
**KEEP EVERYTHING IN ORDER AND KEEP THE GRABBY ASSISTANT OR NEIGHBOR'S HANDS OFF OR SOMETHING WILL GET SCREWED UP!**
It may be possible to perform this without draining all the fluid since you really don't need to remove the pan, but it would most definately prevent any spills should the transmission become tipped in the wrong direction.
PARTS LIST from www.wittrans.com
Qty: 4 WA67106C FRI. A140/A240 DIRECT/O. 2.08ea.
Qty: 4 WA67122A STEEL. A130/A140/A240 FO 1.41ea.
Total for replacing this clutch set was $28.96 shipped to my door. Depending on which set is bad, they list inside or outside diameters of parts as well as teeth counts, so if different clutches are bad you should be able to find the ones you need on there for roughly the same price.
All in all a car can be possibly taken from junk to repaired for under $30 in a weekend.
Before removing transmission: Wash down transmission as best you can. Drain fluid.
After removing transmission:
1. Pull off torque converter and drain differential if you cannot plug the drivers side hole on the differential.
2. Stand transmission up so the pump is pointing up(Pump is behind the torque converter).
3. On the side of the case behind the cooler lines you will see a round recess with an X in it.
Make sure there is not a lot of dirt on it. Remove the internal snap ring. It may require a few light taps with a punch to loosen it, but you should be able to use a pair of pliers and twist/lift it from the case. This is the band apply piston. Pull out the piston and spring. Keep them in order of removal
(large spring->piston->cover->snapring)
4. Take all the bolts loose holding the pump in.
You'll need to use two of the bolts(14mm head) that bolt the trans to engine block. You'll see two holes that are threaded on the pump.
Carefully screw the bolt in by hand until it stops. **CAREFULLY** give
each bolt a turn to pull the pump out of the case. It should not require much pressure to pull remove the pump.
5. Set the pump aside after removal with the outside facing down because you'll be setting the following parts on top of it to keep them in order.
6. The band should now be loose enough to remove first hub assembly and set it on top of the pump.
Be sure to keep it's orientation the same with the pump(closed end towards pump). Inspect the frictions and steels in this hub. They should be a tan or very light brown in color. When we get to the second hub I'll explain in more detail looking at the the clutch frictions/steels.
7. The next hub assembly will contin another clutch pack. This was burned up on this particular transmission.
At this point you should be left with the case looking like this and all clutch packs should be removed except for the one in the end of the case.
I looked at that one first and it was tricky getting the cover back on. If you've looked through everything and it all looks good you can take a look inside there. I'm not going to get into looking at that because you just remove all the bolts and it lifts off. The cover sets back on, but a lot of wiggling/jiggling and praying gets it back on in a timely manner.
1. After locating burned clutch pack, remove snap ring in order to access frictions and steels. Make sure you keep them in order because some steels are thicker than others. These are the pressure apply plates.
For reassembly, perform steps above in reverse order. Document the work you do if you feel you may not remember how to put things back together.
When putting the hubs back into the transmission you'll need to use a twisting motion in order to get the frictions into alignment. You must make sure everything is completely seated together or things will not fit back together. You should not need to use any force other than gravity to get things back together. When you get to the point of installing the pump, you'll need to lube the seal around the pump and gently push it into the case. Making sure the bolt holes line up correctly hand start the pump bolts into the case if possible. You'll then need to sequentially use the pump bolts to slowly draw the pump back into the case. If at any time a bolt becomes hard to turn STOP and investigate the problem. When the pump is fully seated and the pump bolts tightened(roughly 20 ft-lb.). You should be able to turn the small input shaft after the bolts are torqued. If not, something may not be right and you need to double check that everything is installed correctly.
You can now make sure the torque converter is full of fluid and carefully install it in the transmission. MAKE SURE THE CONVERTER IS COMPLETELY IN AND ENGAGED WITH THE TANGS ON THE PUMP.
Last edited by tzfbird; Mar 17, 2010 at 08:13 AM. Reason: Photos

Super Moderator
Joined: Jan 2008
Posts: 15,178
From: PTW
Thanks Tzfbird for the excellent post! Great photos and write up!
I learned a lot and assume other members will also.
As you state the internals just come apart in units to be worked on as required, this would make things much easier.
I take it parts such as the pump, gearing, etc have a long life and items such as the clutch plates get burned assuming due to low fluid level, high fluid temps and or never changing the fluid. Is this correct?
And if just changing clutch packs, etc, as you state you never need to get into the valve body and I assume diff housing?
I will keep you post on file for future reference. Many owners are willing to rebuild the engine but stop at auto trans repair, often buying a used one that may or may not be in any better shape.
Thanks again for post, great photos and write up!
Perhaps you can help with another CF member problem (member way2qwk4u). The car has an A140E trans.
The trans up shifts to the point of torque converter lockup. When the owner takes their foot off gas to come to a stop the RPM drops to below 1K and then the engine dies. He states the trans never down shifts.
If the owner puts the car into Neutral and restarts the engine the trans will work OK again until needing to down shift, then the problem repeats.
The trans is able to down shift if full throttle is applied.
States solenoids test OK and converter passed the stall test. No trouble codes.
He has runs some tests and states the ECU is never providing a signal to turn off the SL solenoid.
I gave him all the FSM links.
I suspect a valve is plugged inside the trans to prevent pressure relief, the torque converter one-way clutch is bad, maybe a bad ECU but would do a few more tests.
His posts are on this site.
Any opinions?
Thanks a lot
Thread Starter
|
Member
Joined: Jan 2010
Posts: 44
Well, don't take any of this as good yet. I got it all back together and the trans in the car and it moves, but must give quite a bit of throttle. I'm sure just the 20 feet I got it to move did quite a bit of damage to the new clutches. I did not set the shift cable that runs off the throttle per the procedure, so that's going to be the next thing to try first.
Tried pushing back into garage, but it feels as though the parking brake is dragging(which it's not).
Looks like trans is coming back out again though. If you remember at the bottom where I said that the input shaft was hard to turn... well, this may be the cause of it. Which is part of the reason I wanted to do this. But I mainly hoped it would work. I'm in the process of locating a hoist so I can pull the motor/trans out the top. We did this out at a salvage yard and had it pulled in around an hour, but that involved cutting wires and hoses instead of disconnecting them.
Last edited by tzfbird; Mar 17, 2010 at 08:29 PM.
Thread Starter
|
Member
Joined: Jan 2010
Posts: 44
Well I was wrong. It is very helpful if you put in the correct amount of fluid. For some reason it doesn't want to move with half the required amount in it.
So, I'm going to say that the number one cause of transmission failure in these vehicles is oil starvation from running low. So I would say it's safe to say that the Forward Clutch pack (the set replaced in this post) is the first to go out. When this happens you will loose all forward movement.
Lucrative business #1:
*Pick up bad A140/A140E transmission
*Spend $30 for clutch set
*Install clutches
*Check solonoid valves/replace filter
*1-2 hours of labor
*Sell For $250 for $100-$200 profit
Who doesn't like to make $50-100/hour while waiting for your clothes to dry?


Junior Member
Joined: Sep 2011
Posts: 2
I'm bolting my pump back on and the center shaft is rotating free untill the very last bit of tightening. At that point it become impossible to turn.
I should mention, that the tranny is still in the car. I have the engine out for repairs, and wanted to replace the front tranny seal. I removed the pump to do this. So now I am trying to get the pump back on.
I did not remove the band apply piston. Is that my problem???
I should mention, that the tranny is still in the car. I have the engine out for repairs, and wanted to replace the front tranny seal. I removed the pump to do this. So now I am trying to get the pump back on.
I did not remove the band apply piston. Is that my problem???
Thread Starter
|
Member
Joined: Jan 2010
Posts: 44
No, I had that same problem except it was just a lot harder to turn than before I started.
My thought in your case is that maybe the input shaft/drum had tipped down and some of the clutches inside have disengaged. Have you tried jiggling/rotating and pushing on the shaft(with pump removed) in case something has become misaligned? As you can tell in the pics I had everything vertical, so I can't imagine doing it that way.
Just make sure the shaft can still rotate when it is back together. You can try for a half hour to get something together in a transmission, take a break and when you get back it just falls into place. One instance where stress gets you nowhere very fast.