

 Aug 28, 2015, 10:08 AM
Last edit by: IB Advertising
See related guides and technical advice from our community experts:
Browse all: Engine
- Toyota Camry 4th, 5th, and 6th gen How to Paint Engine Cover
Step by step instructions for do-it-yourself repairs.
Browse all: Engine

DIY: HID projector retrofit Lexus RX330 for 2007-2010 Camry

Thread Starter
|
Junior Member
Joined: Aug 2012
Posts: 4
From: Virginia
So I have had my 2007 Camry XLE for only 2 weeks and already I have the first custom mod completed!
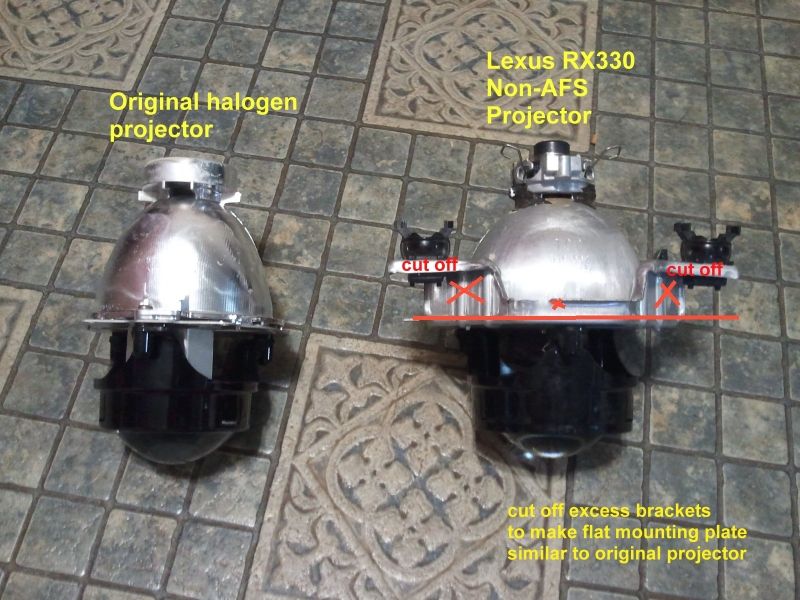
There is but one factory HID projector that is nearly "bolt up" to the 2007-2010 Camry projector mounting point and that is the Lexus RX330 (non-AFS) HID projector.
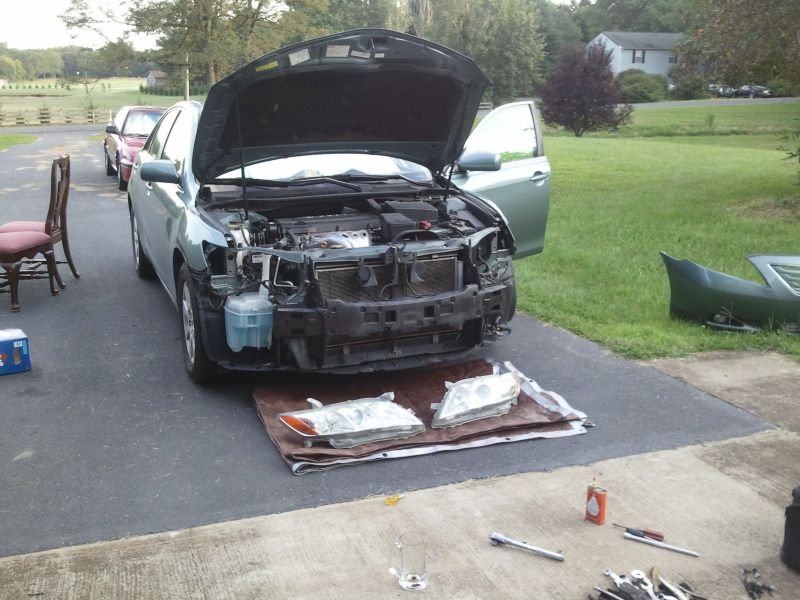
The headlights must be removed first (remove the bumper cover to expose the hidden bolt that holds the outside corner of each lamp in place.
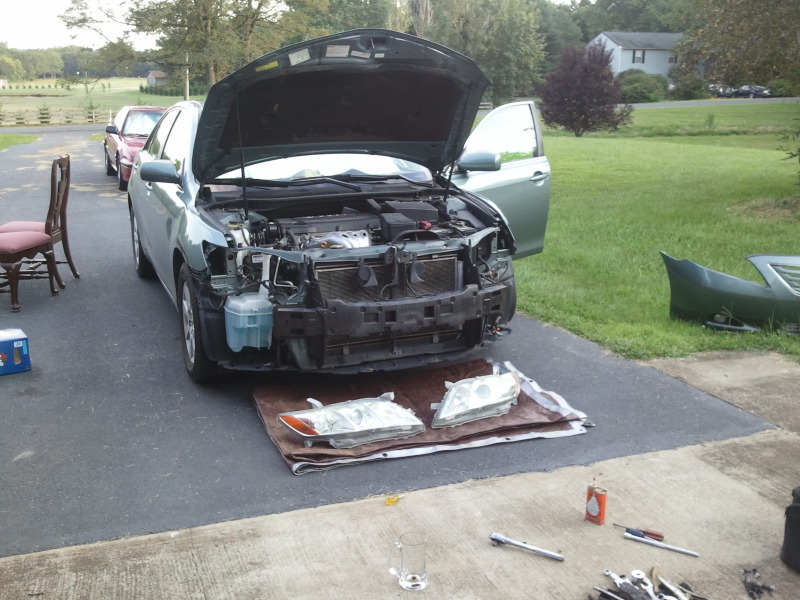
Carefully remove the headlight lenses by heating in the oven at no more than 210 F for 10 minutes to soften the sealant and allow the lenses to be separated by prying apart and cutting the sealant as it stretches.
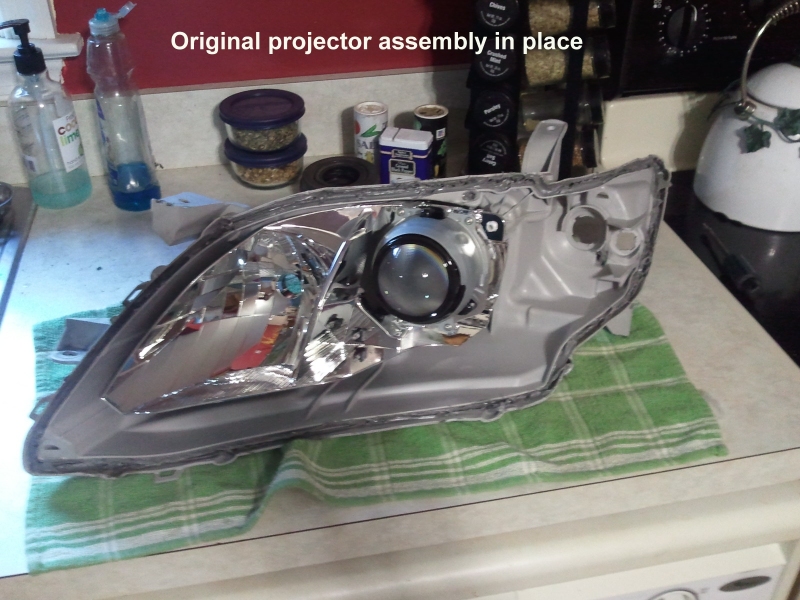
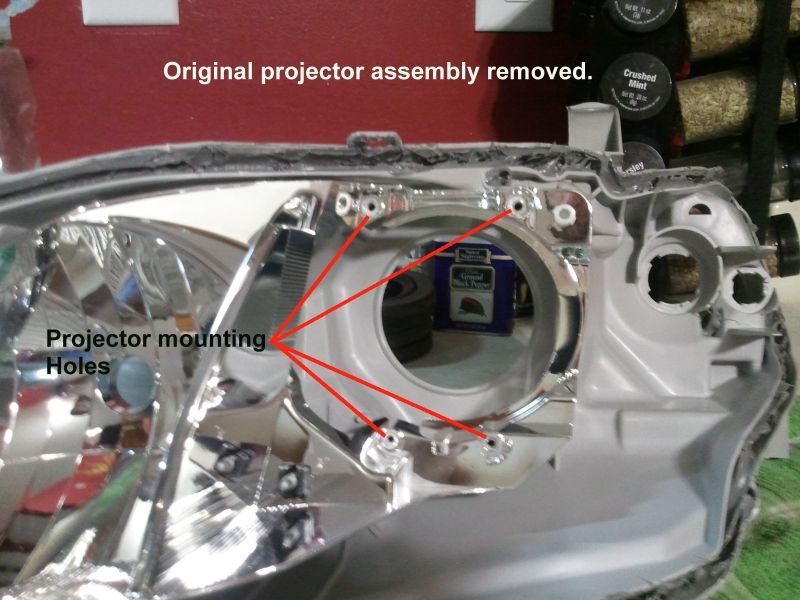
Next we will remove the original projector from the housing and disassemble.
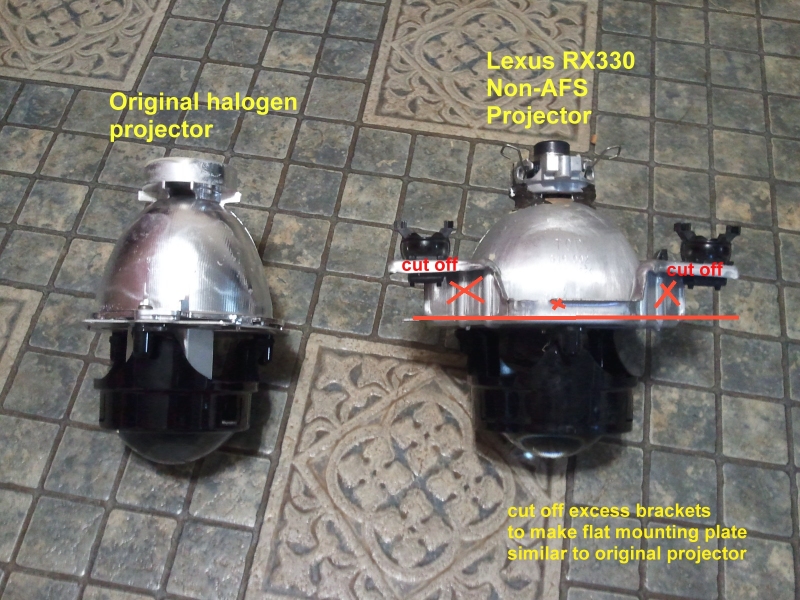
Here is the original halogen projector shield and the RX330 side by side. The shield on both of these projectors also acts as a mounting bracket for the projector which is in 2 halves:
Projector removed:

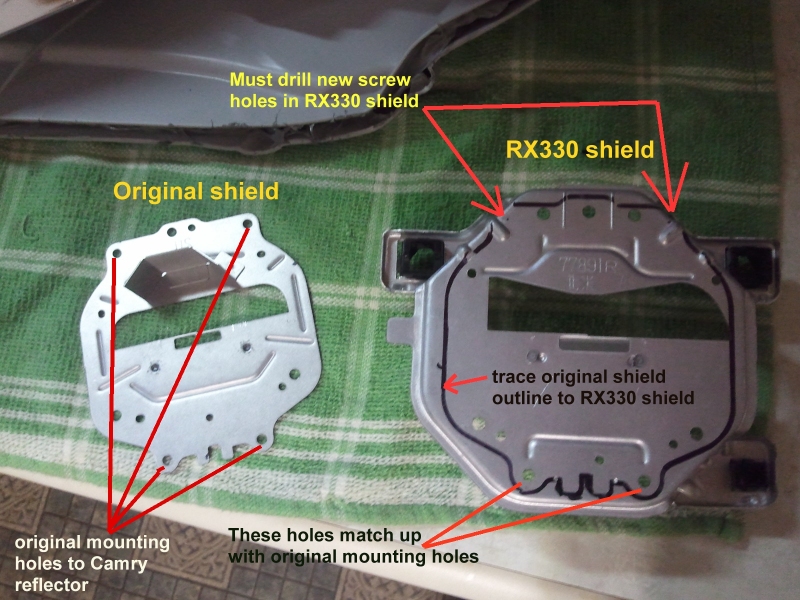
Trim the shield of the RX330 projector to make it flat as shown on the right:
Test fit and mark where holes must be drilled:

Note: in the above picture I had already drilled out the new holes to allow the screws to attach the upper part of the shield. Go slow and if you make the holes too large, just use a thin washer to help your screws hold snug on the shield surface.
drill holes and test fit:
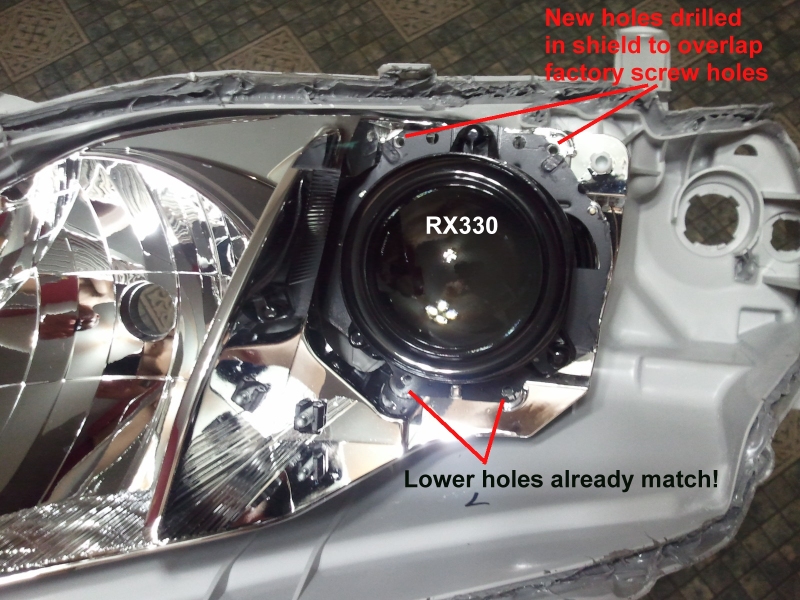
Since you used the existing screw holes the cutoff shield will be rotationally level just as your factory halogen cutoff line was!
I painted my cutoff shield flat high-temp black paint...you can also use colored high temp paint (caliper paint) if you want the projector lens to show through a color...I think it looks mean in black because with the headlights off the projector looks solid black.
Reassemble the headlight and be sure to use more headlight sealant in the housing groove and heat in oven again so you can clamp the lenses back on using pliers and the 8 screws that help hold the housing to the lenses.
The RX330 projectors use D2S HID bulbs. I used Phillips 85122+ bulbs which are one of the best you can get. You will also need to run 35 watt HID ballasts with D2S connectors to the bulbs just as you would with an HID kit but using D2S connectors instead. The ballasts can be powered directly off the original low beam sockets but it is best to use a fused relay harness to take power directly from the car battery when the headlights are switched on...this prevents damage to factory headlight wiring in the event of a short in the ballast or wiring.
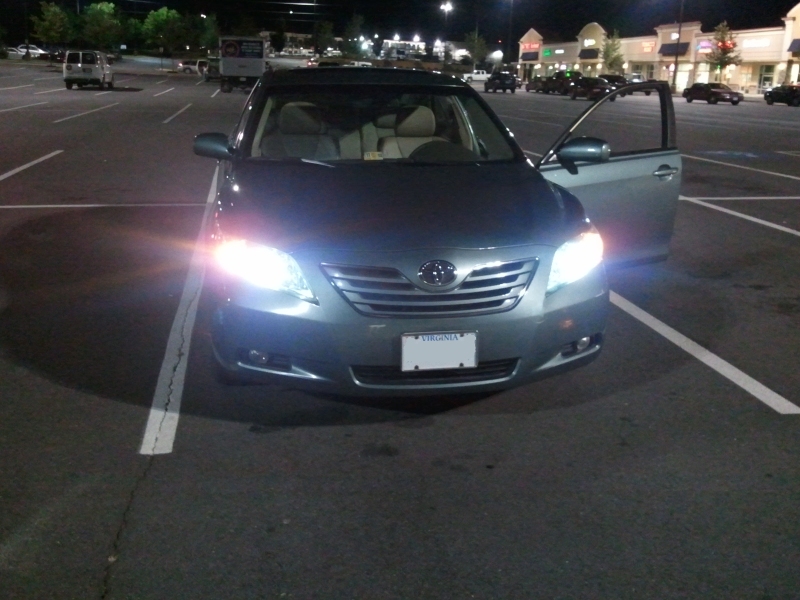
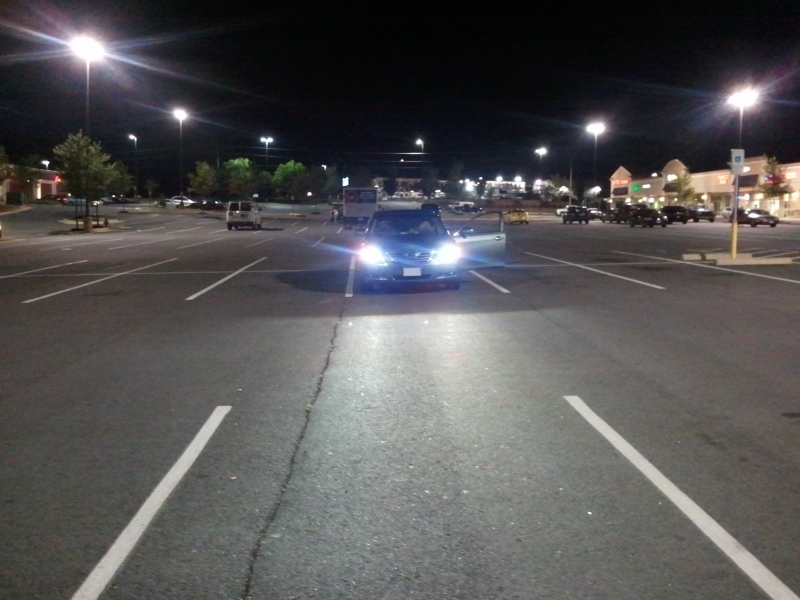
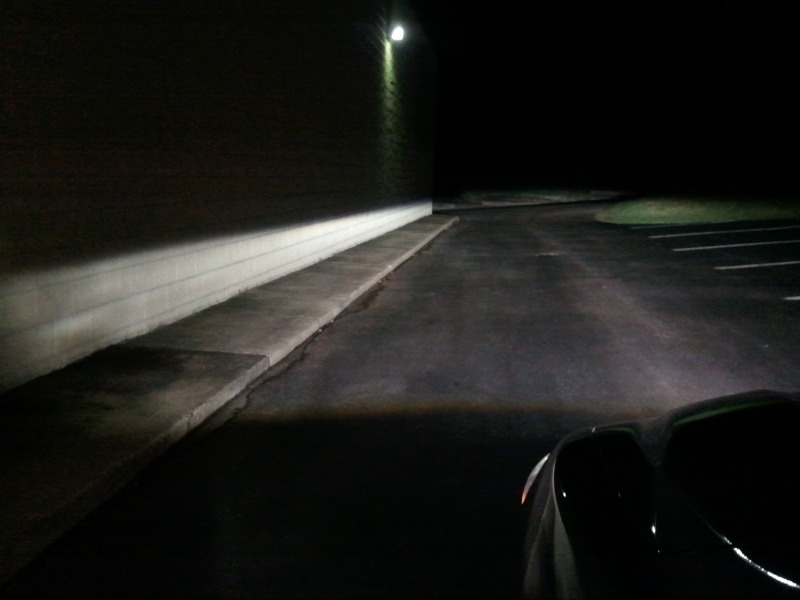
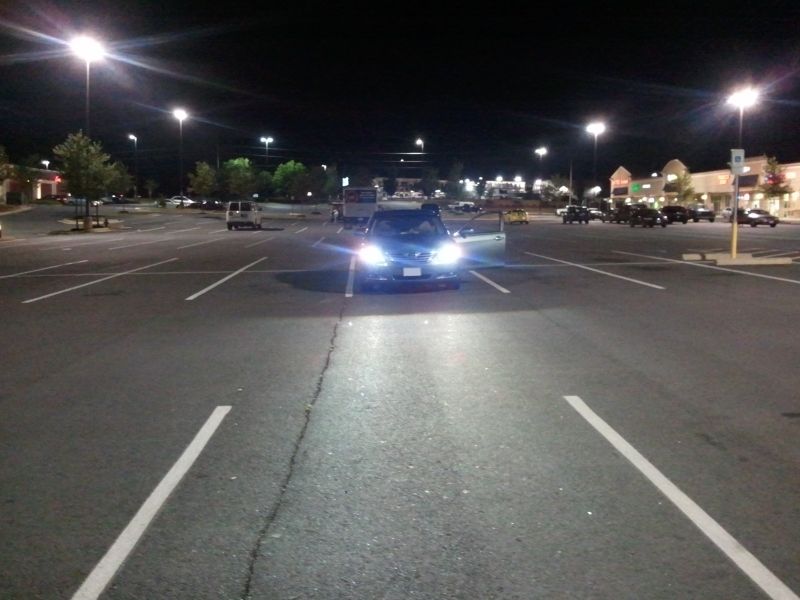
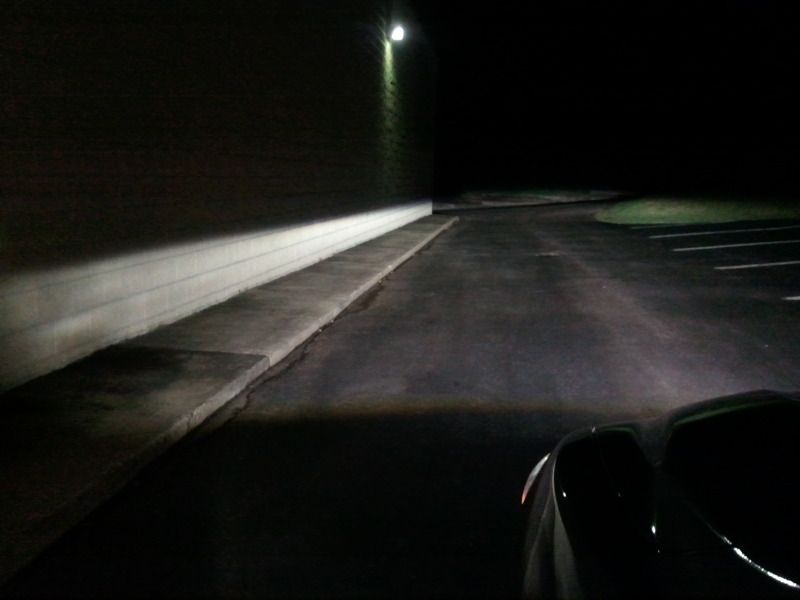
The RX330 was the projector the Toyota Camry needed all along to realize it's full potential! Why did Toyota not offer this as an option?! The light output is at least 2 times as bright and much wider!
There is but one factory HID projector that is nearly "bolt up" to the 2007-2010 Camry projector mounting point and that is the Lexus RX330 (non-AFS) HID projector.
The headlights must be removed first (remove the bumper cover to expose the hidden bolt that holds the outside corner of each lamp in place.
Carefully remove the headlight lenses by heating in the oven at no more than 210 F for 10 minutes to soften the sealant and allow the lenses to be separated by prying apart and cutting the sealant as it stretches.
Next we will remove the original projector from the housing and disassemble.
Here is the original halogen projector shield and the RX330 side by side. The shield on both of these projectors also acts as a mounting bracket for the projector which is in 2 halves:
Projector removed:
Trim the shield of the RX330 projector to make it flat as shown on the right:
Test fit and mark where holes must be drilled:
Note: in the above picture I had already drilled out the new holes to allow the screws to attach the upper part of the shield. Go slow and if you make the holes too large, just use a thin washer to help your screws hold snug on the shield surface.
drill holes and test fit:
Since you used the existing screw holes the cutoff shield will be rotationally level just as your factory halogen cutoff line was!
I painted my cutoff shield flat high-temp black paint...you can also use colored high temp paint (caliper paint) if you want the projector lens to show through a color...I think it looks mean in black because with the headlights off the projector looks solid black.
Reassemble the headlight and be sure to use more headlight sealant in the housing groove and heat in oven again so you can clamp the lenses back on using pliers and the 8 screws that help hold the housing to the lenses.
The RX330 projectors use D2S HID bulbs. I used Phillips 85122+ bulbs which are one of the best you can get. You will also need to run 35 watt HID ballasts with D2S connectors to the bulbs just as you would with an HID kit but using D2S connectors instead. The ballasts can be powered directly off the original low beam sockets but it is best to use a fused relay harness to take power directly from the car battery when the headlights are switched on...this prevents damage to factory headlight wiring in the event of a short in the ballast or wiring.
The RX330 was the projector the Toyota Camry needed all along to realize it's full potential! Why did Toyota not offer this as an option?! The light output is at least 2 times as bright and much wider!
Last edited by Jayhem; Aug 20, 2012 at 02:18 PM.


Junior Member
Joined: Jul 2013
Posts: 1
So I have had my 2007 Camry XLE for only 2 weeks and already I have the first custom mod completed!
There is but one factory HID projector that is nearly "bolt up" to the 2007-2010 Camry projector mounting point and that is the Lexus RX330 (non-AFS) HID projector.
The headlights must be removed first (remove the bumper cover to expose the hidden bolt that holds the outside corner of each lamp in place.
Carefully remove the headlight lenses by heating in the oven at no more than 210 F for 10 minutes to soften the sealant and allow the lenses to be separated by prying apart and cutting the sealant as it stretches.

Next we will remove the original projector from the housing and disassemble.
Here is the original halogen projector shield and the RX330 side by side. The shield on both of these projectors also acts as a mounting bracket for the projector which is in 2 halves:

Projector removed:
Trim the shield of the RX330 projector to make it flat as shown on the right:
Test fit and mark where holes must be drilled:

Note: in the above picture I had already drilled out the new holes to allow the screws to attach the upper part of the shield. Go slow and if you make the holes too large, just use a thin washer to help your screws hold snug on the shield surface.
drill holes and test fit:

Since you used the existing screw holes the cutoff shield will be rotationally level just as your factory halogen cutoff line was!
I painted my cutoff shield flat high-temp black paint...you can also use colored high temp paint (caliper paint) if you want the projector lens to show through a color...I think it looks mean in black because with the headlights off the projector looks solid black.
Reassemble the headlight and be sure to use more headlight sealant in the housing groove and heat in oven again so you can clamp the lenses back on using pliers and the 8 screws that help hold the housing to the lenses.
The RX330 projectors use D2S HID bulbs. I used Phillips 85122+ bulbs which are one of the best you can get. You will also need to run 35 watt HID ballasts with D2S connectors to the bulbs just as you would with an HID kit but using D2S connectors instead. The ballasts can be powered directly off the original low beam sockets but it is best to use a fused relay harness to take power directly from the car battery when the headlights are switched on...this prevents damage to factory headlight wiring in the event of a short in the ballast or wiring.
The RX330 was the projector the Toyota Camry needed all along to realize it's full potential! Why did Toyota not offer this as an option?! The led lighting output is at least 2 times as bright and much wider!

There is but one factory HID projector that is nearly "bolt up" to the 2007-2010 Camry projector mounting point and that is the Lexus RX330 (non-AFS) HID projector.
The headlights must be removed first (remove the bumper cover to expose the hidden bolt that holds the outside corner of each lamp in place.
Carefully remove the headlight lenses by heating in the oven at no more than 210 F for 10 minutes to soften the sealant and allow the lenses to be separated by prying apart and cutting the sealant as it stretches.
Next we will remove the original projector from the housing and disassemble.
Here is the original halogen projector shield and the RX330 side by side. The shield on both of these projectors also acts as a mounting bracket for the projector which is in 2 halves:
Projector removed:
Trim the shield of the RX330 projector to make it flat as shown on the right:
Test fit and mark where holes must be drilled:
Note: in the above picture I had already drilled out the new holes to allow the screws to attach the upper part of the shield. Go slow and if you make the holes too large, just use a thin washer to help your screws hold snug on the shield surface.
drill holes and test fit:
Since you used the existing screw holes the cutoff shield will be rotationally level just as your factory halogen cutoff line was!
I painted my cutoff shield flat high-temp black paint...you can also use colored high temp paint (caliper paint) if you want the projector lens to show through a color...I think it looks mean in black because with the headlights off the projector looks solid black.
Reassemble the headlight and be sure to use more headlight sealant in the housing groove and heat in oven again so you can clamp the lenses back on using pliers and the 8 screws that help hold the housing to the lenses.
The RX330 projectors use D2S HID bulbs. I used Phillips 85122+ bulbs which are one of the best you can get. You will also need to run 35 watt HID ballasts with D2S connectors to the bulbs just as you would with an HID kit but using D2S connectors instead. The ballasts can be powered directly off the original low beam sockets but it is best to use a fused relay harness to take power directly from the car battery when the headlights are switched on...this prevents damage to factory headlight wiring in the event of a short in the ballast or wiring.
The RX330 was the projector the Toyota Camry needed all along to realize it's full potential! Why did Toyota not offer this as an option?! The led lighting output is at least 2 times as bright and much wider!
Last edited by ArturoParsons; Jul 22, 2013 at 12:53 AM.
Thread Starter
|
Junior Member
Joined: Aug 2012
Posts: 4
From: Virginia
This is hands down the best modification you can do to this car for under $500.

Thread
Thread Starter
Forum
Replies
Last Post
1296camry01
DIY - Do It Yourself
1
Aug 19, 2013 01:14 AM
Jayhem
PRIVATE For Sale / Trade Classifieds
0
Aug 12, 2013 02:30 PM
piscesknite
Appearance
7
Jun 11, 2007 11:39 AM